Part 1 - basics
This part of the tutorial introduces several important concepts required in complex Flask applications. They are introduced gradually as we go through the development. Our application will end up with a large number of files with different purposes and so the first thing we will do is create some structure so that the code stays organised.
The Hello World app created by default consists only of a single file. In this section, we will adapt the default structure for our purposes. At each stage of the process we will run the application to make sure that everything continues to work as intended.
Directories
The first thing to do is modify the directory structure to match the following:
    └── students_app
        ├── app/
        │   └── templates/
        └── instance/
The purpose of each directory is described below.
students_app: This is the project root directory. All code related to the project is located within this directory.
app: The application package containing all of the operational code.
templates: HTML layouts for different pages of the application
instance: The location for sensitive application settings (e.g. database password)
Configuration settings
A Flask application requires parameters to control its behaviour. Some settings remain the same wherever the application is running, but other settings may change. Because the database on your personal computer is different from the one installed on a server, the database connection string is an example of a setting that has a different value depending on the context.
In this part, we will create two configuration files, one for those settings which are
always the same, and another for settings that depend on the context. Both files are
called config.py but one of them is contained inside the directory called instance.
Because the instance settings include details such as usernames and passwords, the files
in the instance directory are not saved to a code repository.
Create the main configuration file immediately below the project root. You can do this
by right-clicking on the root directory and choosing to create a new Python file from
the pop-up menu. Call the file config.py and paste in the code shown below.
1 2 3 4 5 6 7 8 9 10 11 12 13 14 15 16 | |
Explanation
Lines 1 - 2: Define a class for common settings - in this case there are none yet, but they can be added later as required. The docstring lineprevents an error being reported due to the empty class definition.
Lines 5 - 6: Define a class for development settings which subclasses the main
Configclass. These settings are to be used when running in development mode and will therefore maximise debug output.Lines 9 - 10: Define a class for production settings which minimise debug output.
Lines 13 - 16: Define the
app_configdictionary which contains all our defined configurations. Here we only have two, but we could easily introduce a third for the test environment, for example.
As illustrated above, configuration settings are typically key-value pairs. This is also true for the instance-specific settings. The choice of which set of configuration values to use will be determined by an environment variable.
Create the instance-specific configuration file in the instance directory using the
same method as above and paste in the following code.
1 | |
Explanation
The
SECRET_KEYis used for securely signing the session cookie. It should be a fairly long string of random characters.
Remember that the files in the instance directory should not be saved in the code
repository for security reasons.
Initialisation file
To show that a directory should be treated as a Python package, it needs to contain an
__init__.py file. Often, this file is empty, but where necessary it contains some
initialisation code. The Flask application package falls into the second category.
Create an __init__.py file in the app directory and paste in the following code:
1 2 3 4 5 6 7 8 9 10 11 12 | |
The code is more or less self-explanatory. The main thing to recognise is that it
returns a configured instance of the Flask application object. The function
create_app() is known as the application factory.
Launch script
The purpose of the launch script is to provide a convenient way to start the application
in any environment. Create a file called run.py under the root directory and paste in
the following code:
1 2 3 4 5 6 7 8 9 10 11 12 13 14 15 | |
Explanation
Line 5: The operating system environment valiable
FLASK_ENVselects the configuration to use. This variable will need to be set correctly wherever the application is run. See below for instructions on setting this configuration in PyCharm. In the local environment, we will need it set todevelopment.Line 6: The
appobject is created by passing the desired configuration to the application factory function defined in__init__.py.Lines 9 - 11: This code replaces the app.py file used previously. It defines a single route which returns the message Hello World!
Lines 14 - 15: This is a standard feature of Python scripts which handles the case where the script is called directly.
Test run
At this point, we need to check that the application still runs correctly after all our changes. First, though, we need to update the PyCharm run configuration - this is the set of parameters that PyCharm uses to launch the application. Because you created a Flask project right at the start, an initial run configuration has been created for you. We will make some changes that highlight the three important settings that need to be controlled which are
- The Flask environment to use - here, we will select the
developmentconfiguration that we defined earlier in theapp/config.pyfile - The name of the launch script
- The working directory
To modify the run configuration, choose Edit Configurations... from the Run menu in PyCharm. This will display a dialogue similar to the one shown in Figure 9.
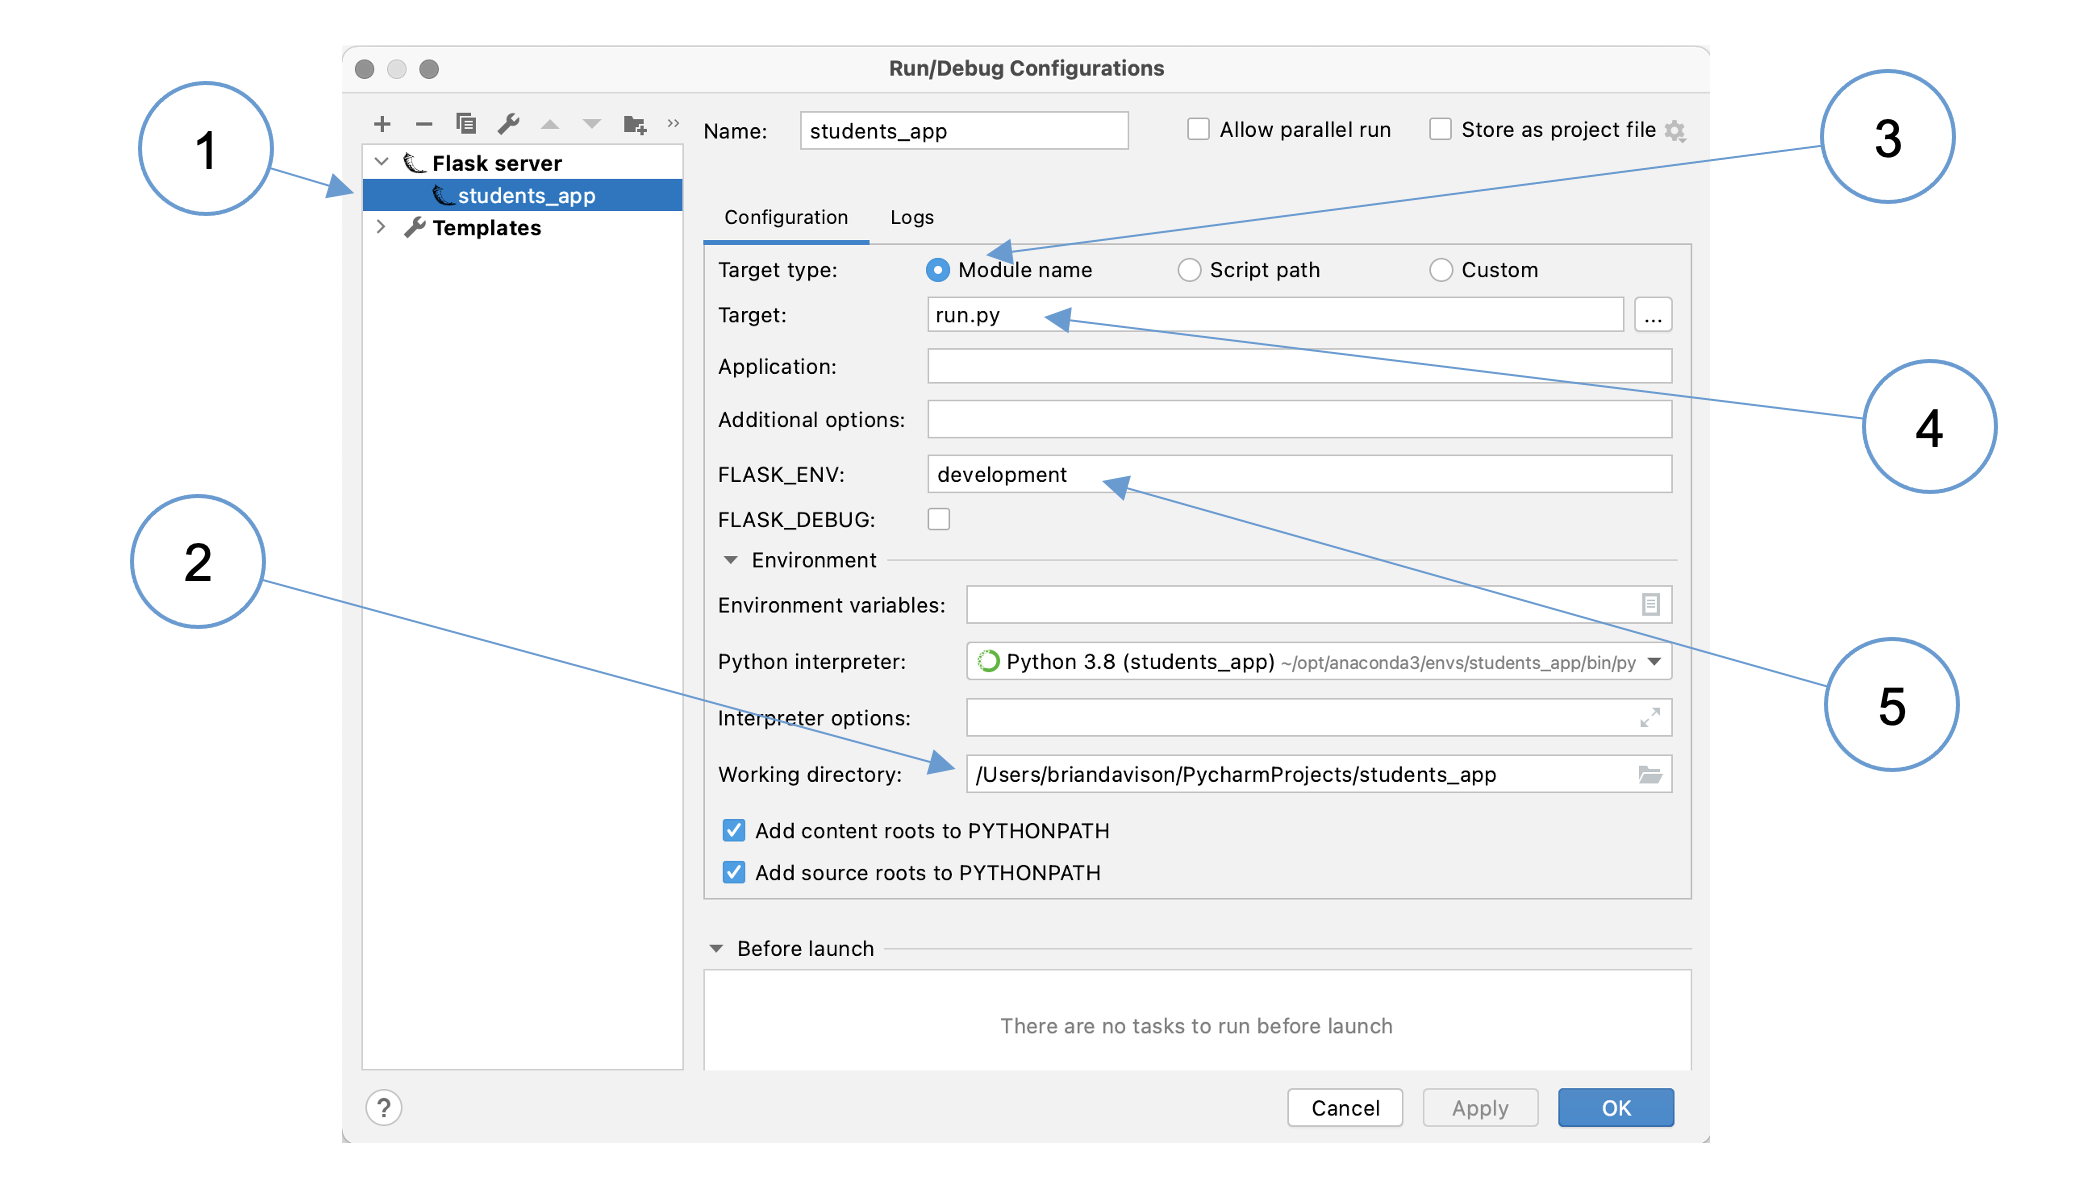 Figure 9: PyCharm run configuration
(1): Activate the students_app configuration. Notice that it uses the Flask server template
(2): Change the working directory to the location of the launch script. By default, PyCharm populates the Target field (4) with the full path of the launch script. You can copy the directory from there, omitting the default launch script name,
app.py.(3): Make sure that the Module name option is selected
(4): Put the name of the launch script,
run.py, into the Target field(5): Check that the
FLASK_ENVvariable is set todevelopment
Once you have saved the configuration, run the application in the usual way and you
should see the message Hello World! in your browser. If that is successful, you
can delete the app.py file which is now redundant. Restart the application after
deleting the file and everything should still work as expected.
One more thing...
There is one further change to make to ensure that the appropriate environment variables are
set correctly when a command shell is started with PyCharm's terminal panel. This means
controlling the same three settings as in the run configuration. One small difference
is that in the terminal, the launch script name is assigned to an environment variable
called FLASK_APP.
To set the values of FLASK_ENV and FLASK_APP we need to use the operating system command
1 | |
Open the PyCharm settings (preferences on Mac) and enter the variable assignment command into
the tools/terminal section as shown in Figure 10.
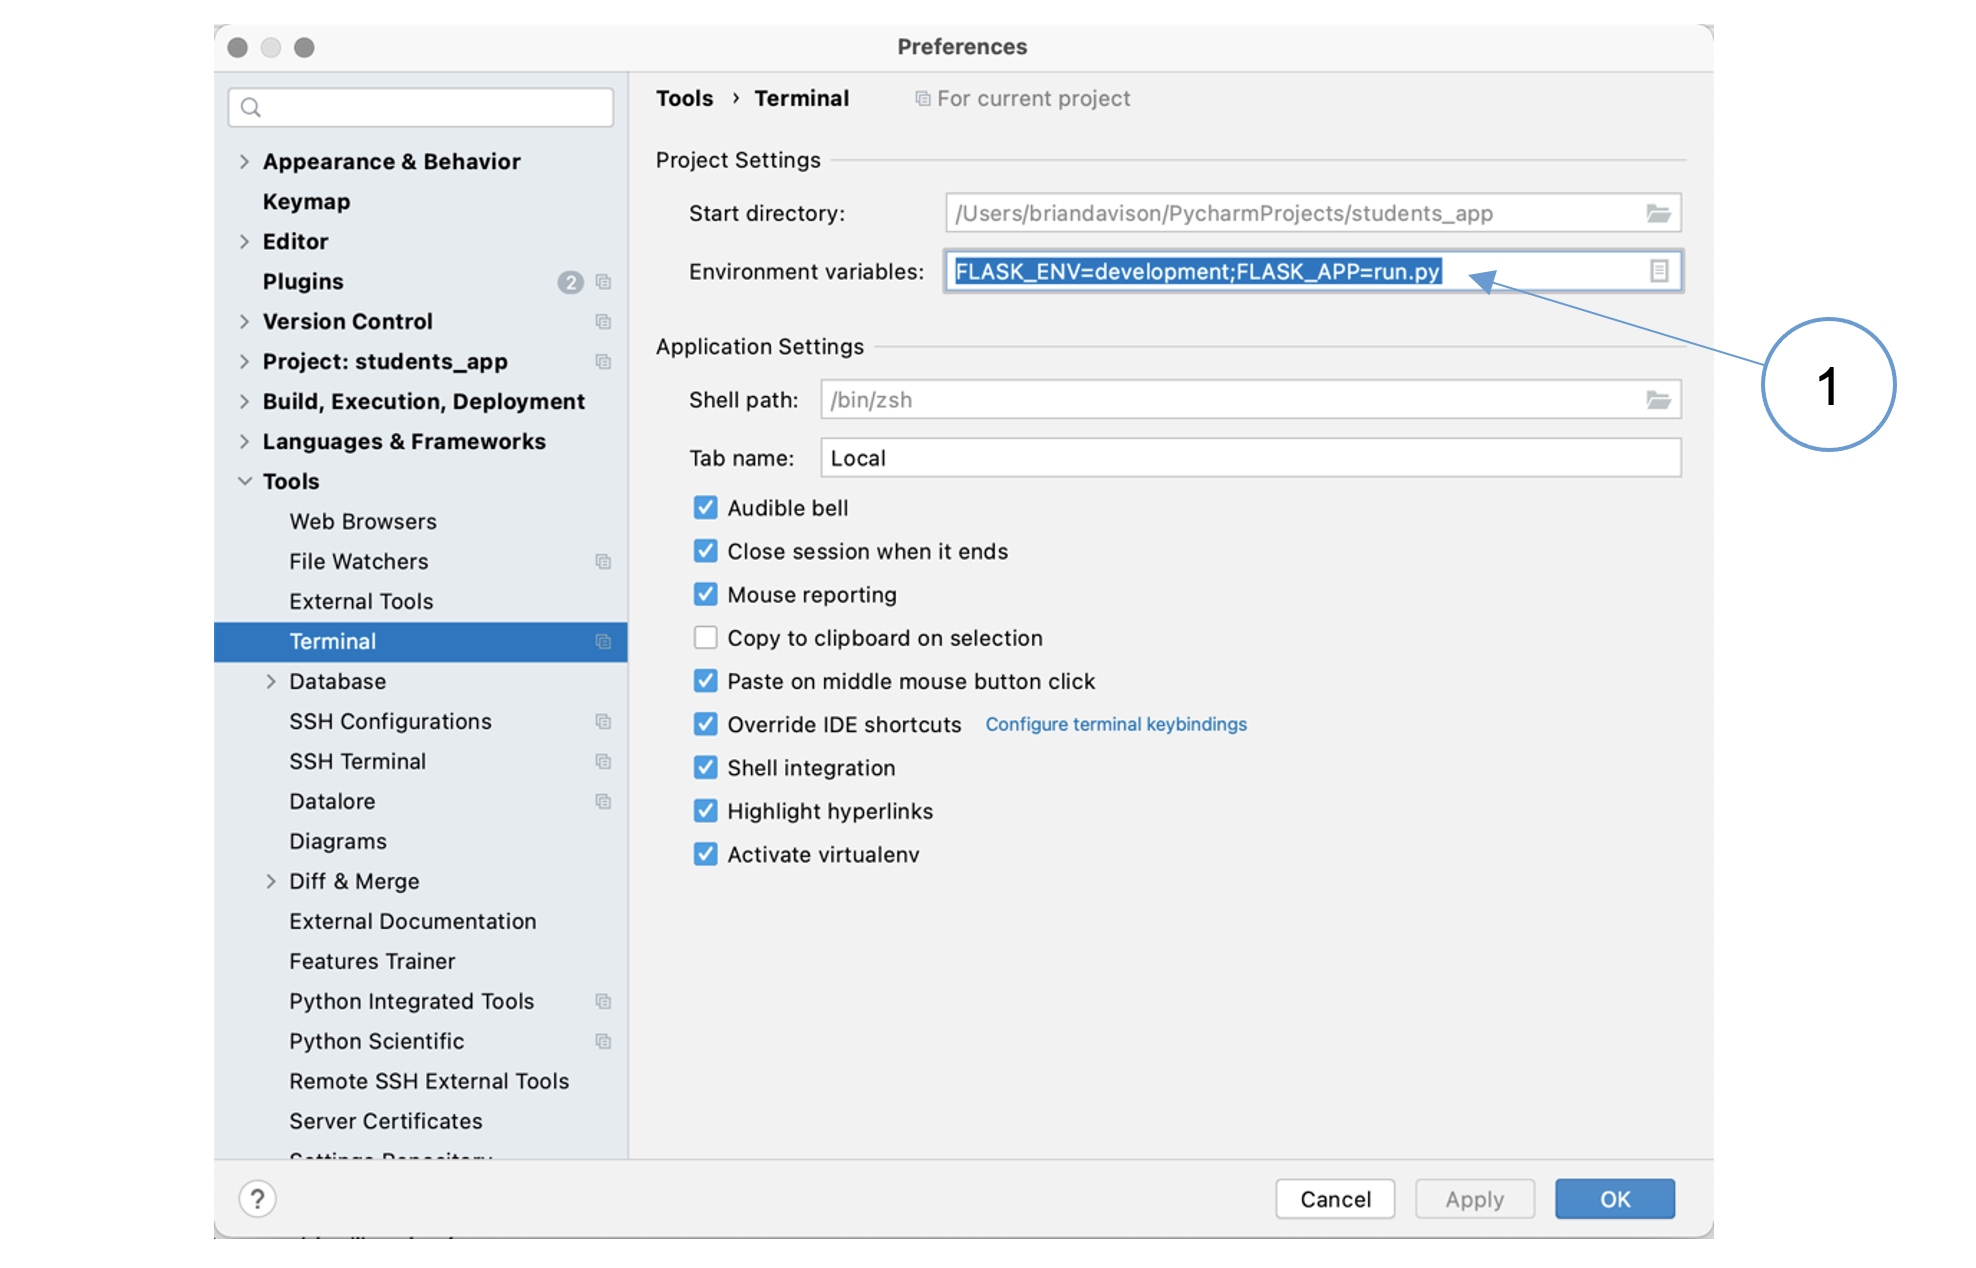 Figure 10: Setting terminal environment variables
Notice that the working directory is set to the same value that you used in the run configuration.
 Flask configuration variables