Setting up PyCharm
The PyCharm IDE is specifically designed to support Python development and provides many time-saving features. You will need a properly-configured installation on your own computer to act as your personal development environment. In the early parts of this tutorial, you will start off using PyCharm on your own, and then later on you will build on that experience to collaborate with other members of the software development team using a shared GitHub repository.
Prerequisites
Before installing and configuring PyCharm, please make sure that you have the following already installed:
Installation
To install PyCharm, download the version for your operating system from the PyCharm website.
Note that if you are a student you can get a free professional licence for 12 months. The professional edition has special features that support Flask projects, and some of them will be used in this tutorial. The community edition can be used, but is less convenient.
Once downloaded, follow the standard procedure to install the application on your computer.
For a brief tour of the capabilities of PyCharm, please see this video
Getting started
This section provides a brief introduction to the main features of PyCharm that will be referred to in this tutorial. Please be aware that PyCharm actually provides a wealth of features to help with Python development but not all of them will be discussed here. For a more cmplete coverage of these features, please refer to the PyCharm documentation.
PyCharm is an excellent choice as your main development tool, but there may be reasons to choose something else. For example, if you are building your application on Microsoft's Azure cloud platform, it would make sense to use Visual Studio because of its integration features.
In order to demonstrate some of the features of PyCharm we will start by creating a
simple Flask application. Figure 4 shows the PyCharm New Project dialogue where a lot
of the basic choices about your working environment can be made. (Note that on Windows,
the reference to conda in the Conda executable field will include .exe at the end.)
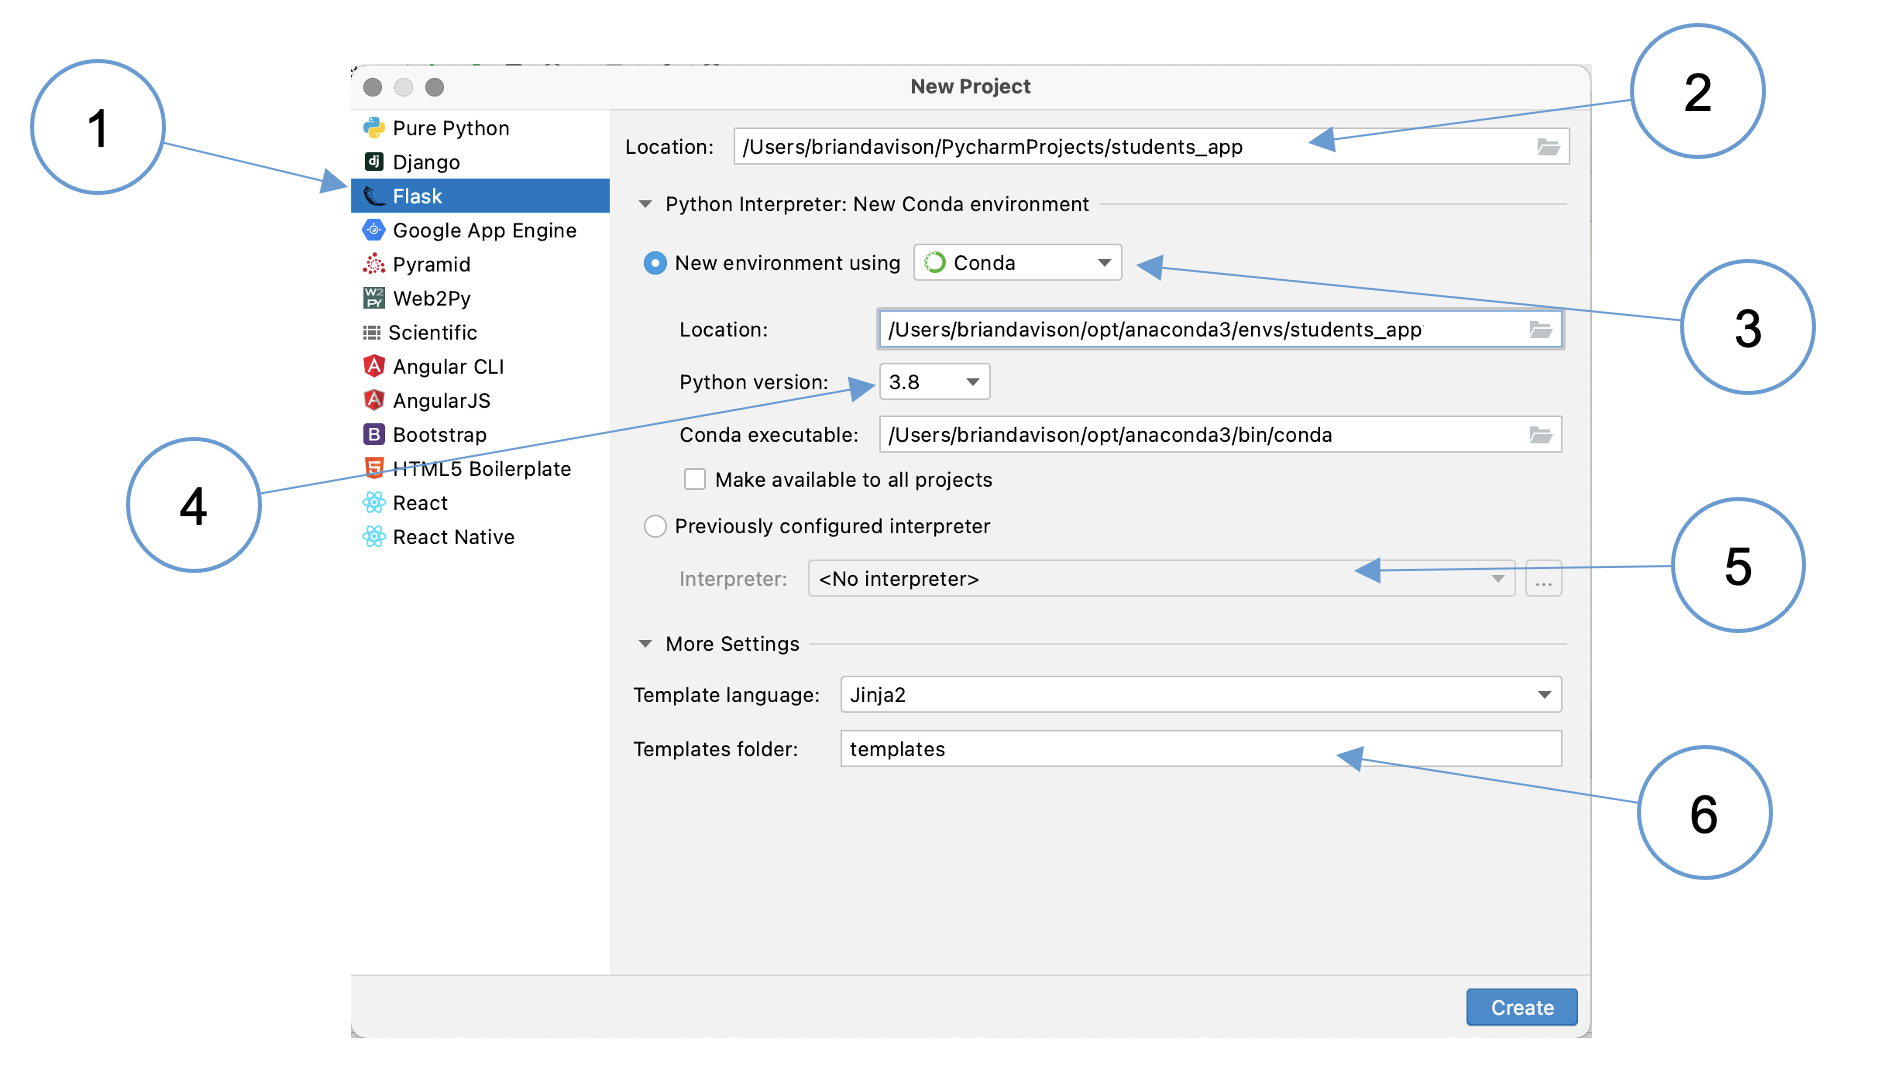 Figure 4: New project dialogue
(1): Choose Flask as the project type - note that this is only available in the professional edition of PyCharm
(2): The name of your project is also the name of its root directory. The default is
flaskProject1. Change it tostudents_app.(3): Because Anaconda is installed, you have the option to choose a conda virtual environment.
(4): If you need to use a specific version of Python, you can specify it here and PyCharm will create a conda environment with that version.
(5): If you want to use a virtual environment that already exists you can locate it using the drop-down list. Here, we will instead create a new conda environment.
(6): Notice that the default location for page templates is a directory called templates. Knowing where your templates are can be important when writing your code.
Once you have specified the necessary parameters, click the Create button and PyCharm will go through a series of setup steps. Eventually, a window like the one in Figure 5 will be displayed.
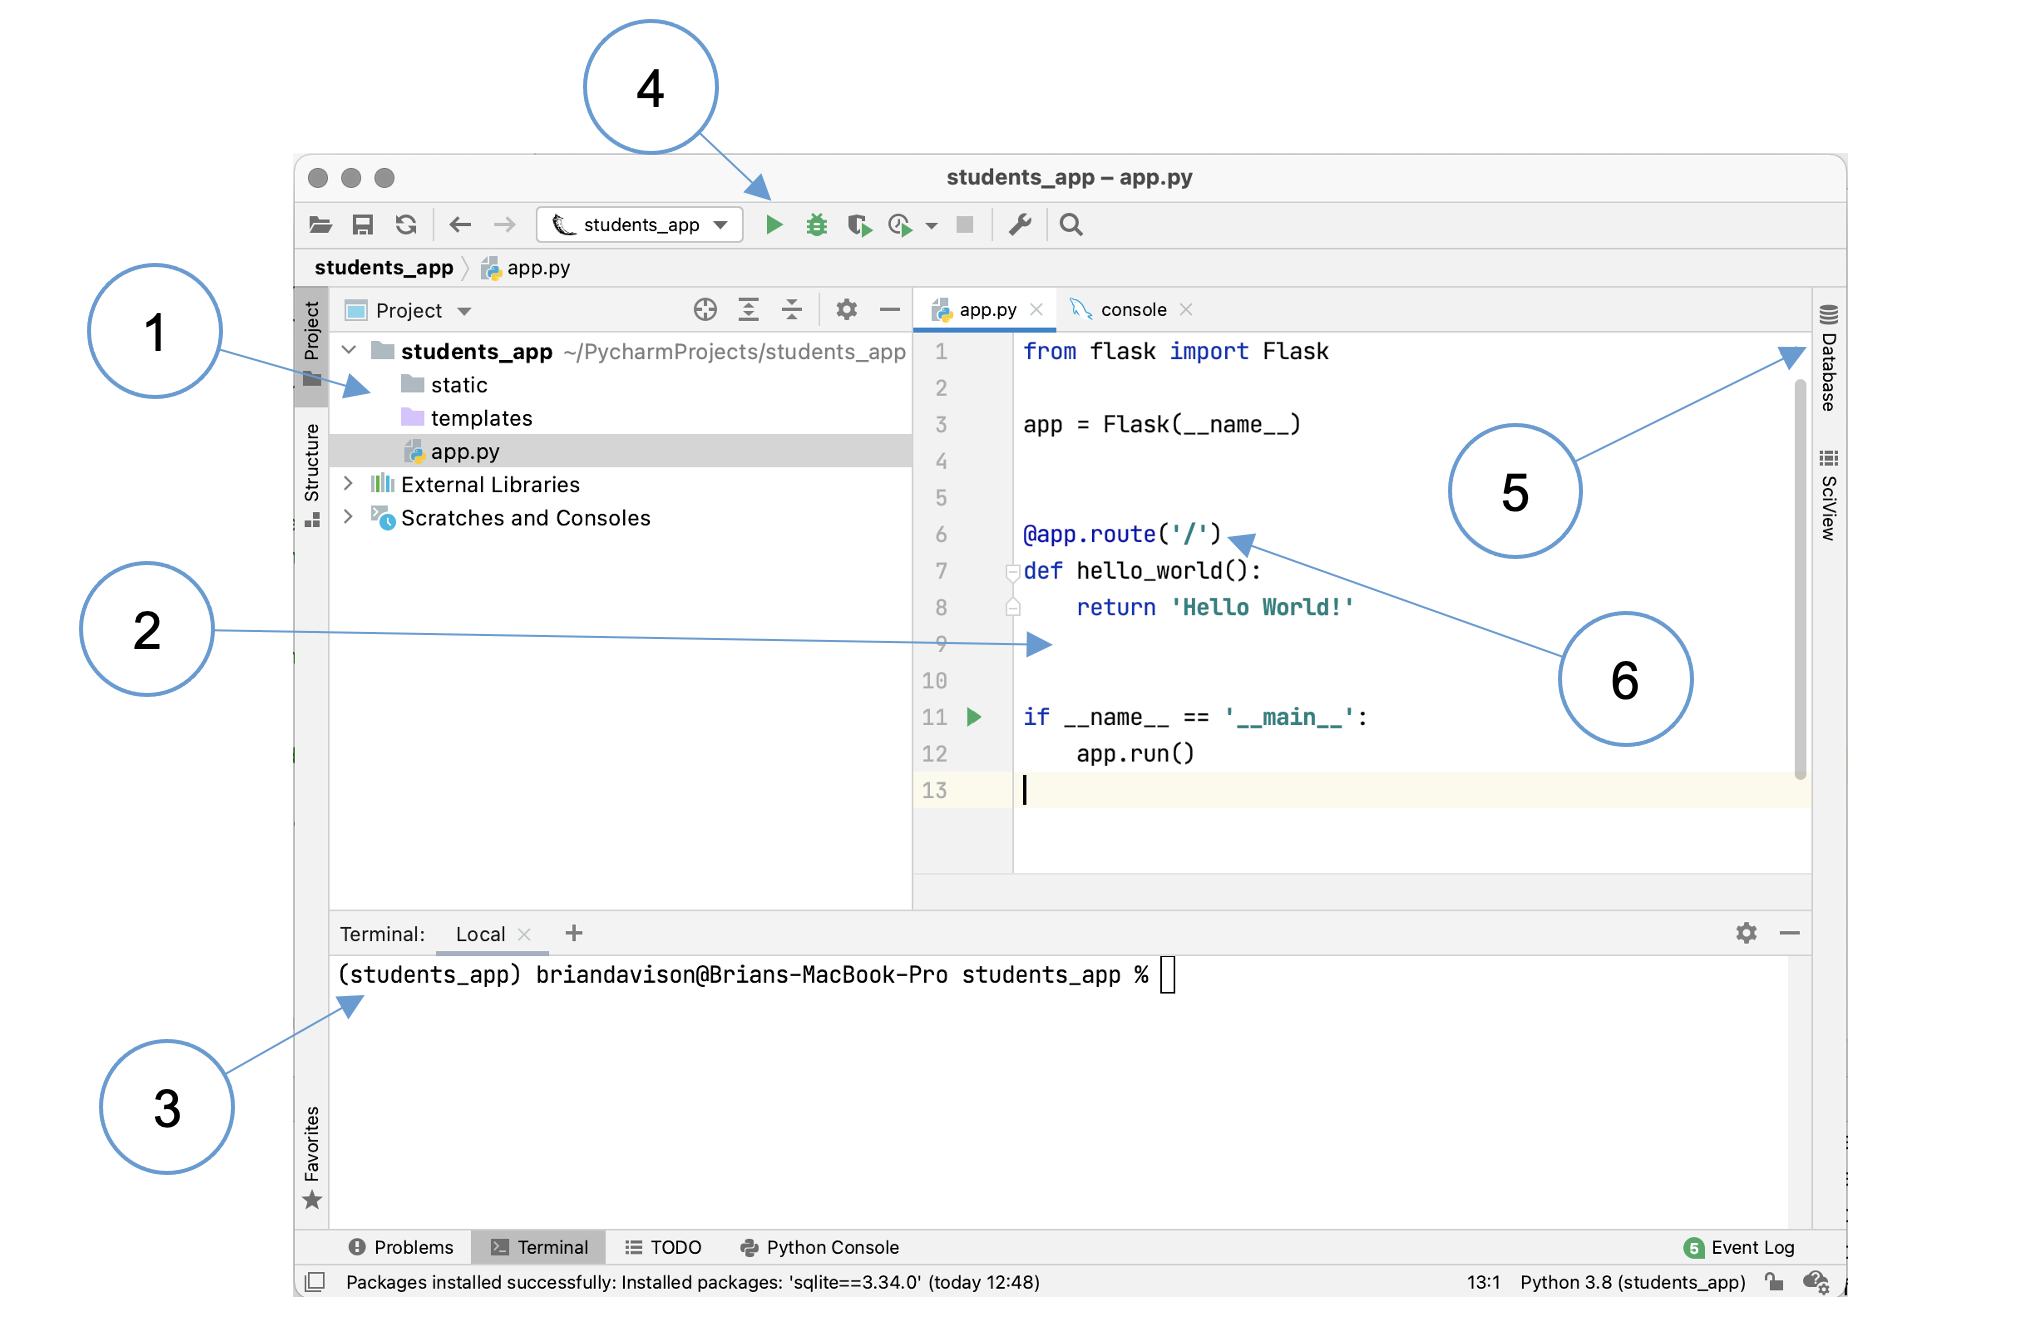
(1): The Project panel gives you a hierarchical view of your code. Notice that the root directory has the same name as your project, and that a templates directory has been created automatically.
(2): Individual files can be opened for editing in the right-hand panel. If you have multiple files open, they can be navigated using the tabs at the top of the panel. The file currently displayed is app.py.
(3): PyCharm allows you to most things from within the IDE including interacting with the operating system. With the Terminal panel selected, notice that a conda virtual environment with the same name as the project has automatically been activated, and that by default, the current directory is the project root directory.
(4): You can run the application locally by using the controls at the top of the window. The green play icon simply runs the app, and the bug icon runs the app in debug mode. In debug mode, PyCharm lets you set breakpoints, step through the code and inspect variable values. Running the app locally relies on the development server that is bundled with Flask.
(5): The database inspection panel allows you to see the tables in the database, run ad-hoc queries and maintain the data. The connection needs to be configured before you can do this - see the later section on this.
(6): The default app contains a single route definition. A route is the external name that can be used to access an application function, or endpoint. In the default app, the route is
/which indicates the application root. This connects to the Python functionhello_world()which is the actual endpoint.
The default app requires no additional work before it can be run. Click the green
Run icon (4) to start the development server. A Run panel will open at the bottom
of the window where you will see some diagnostic messages. One of these will show
the URL that you can use to access the app through your browser. The address will be
something like http://127.0.0.1:5000. You could type it into your browser directly,
or just click it in the Run panel.
Making a database connection
When you first open the Database panel (5), it is empty because you have not yet configured any connections. Click the new connection icon as shown in Figure 6 to add a new one.
 Figure 6: New database connection
(1): Click the plus sign to create a new database connection
(2): Choose MySQL from the available options
The next dialogue (Figure 7) requires some of the values that were used in the database setup section.
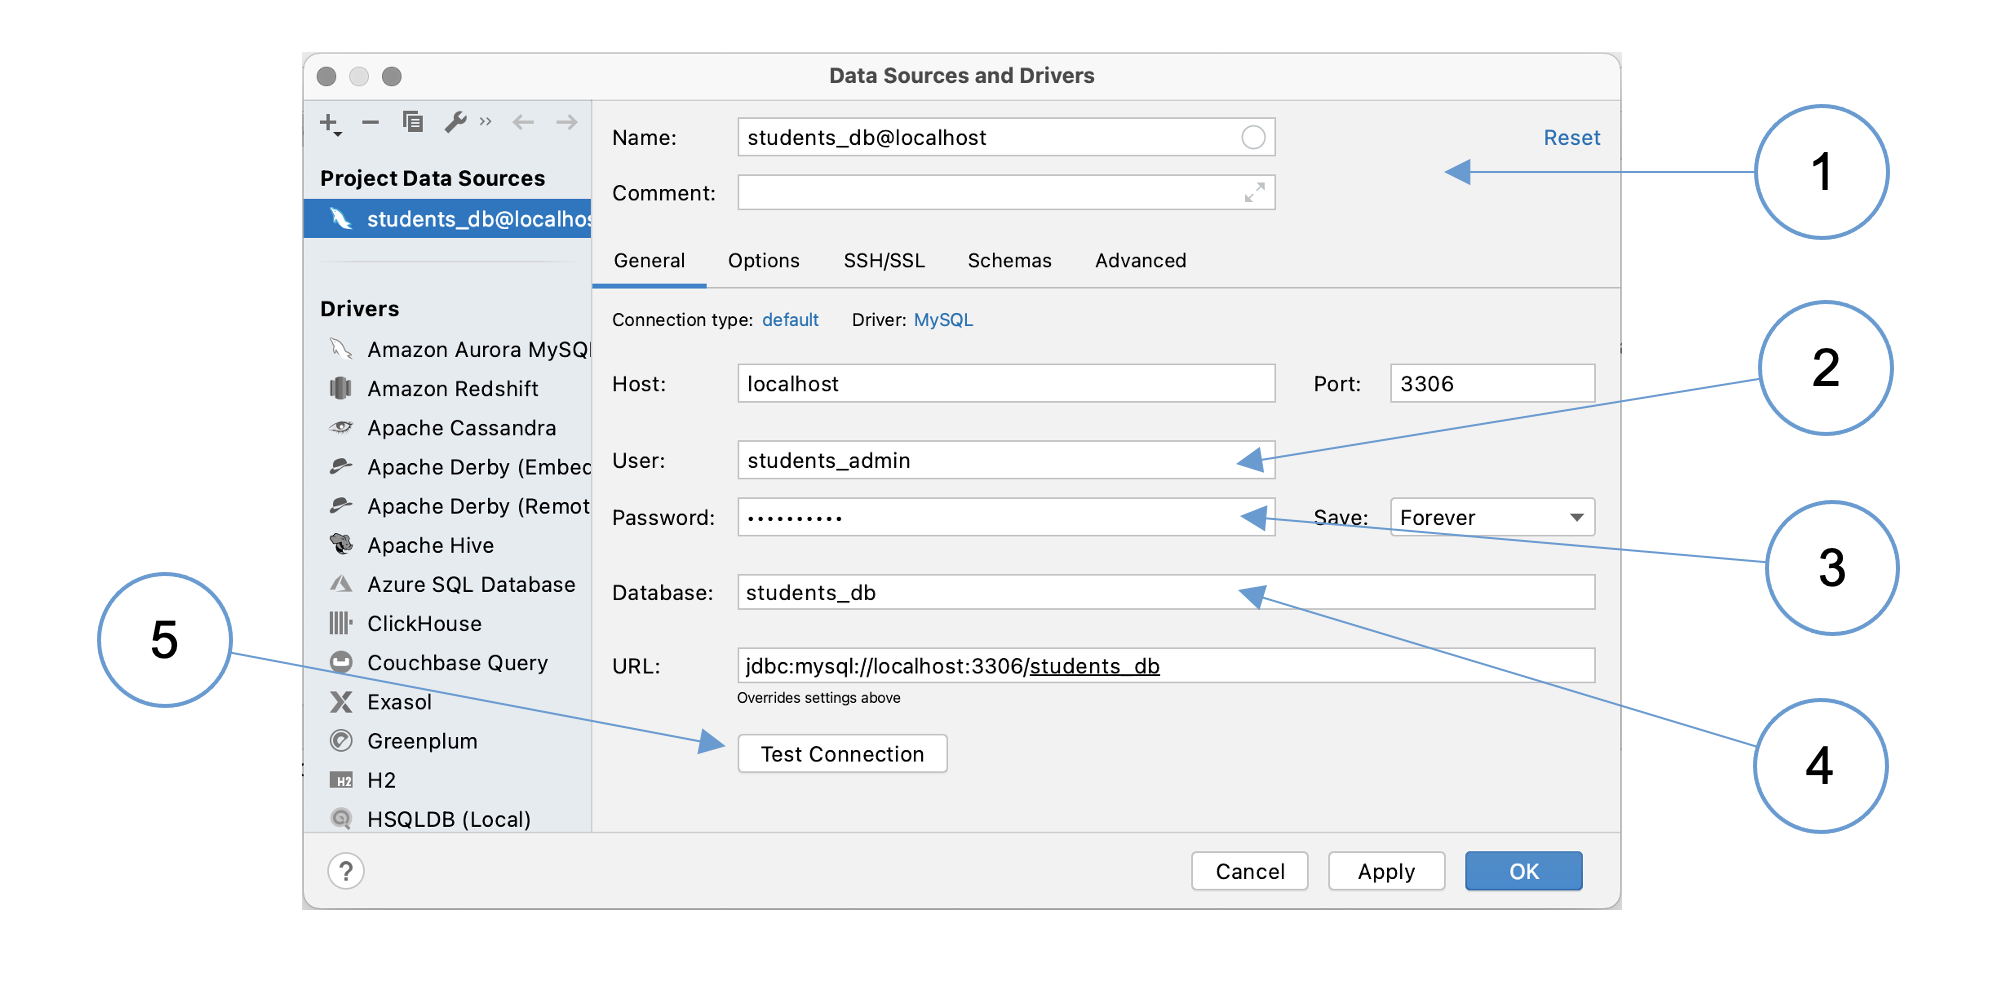 Figure 7: Database connection details
(1): The top section of the dialogue does not need to be changed. The name of the connection will be derived automatically.
(2): Enter the name of the user that was set up earlier
(3): Enter the password that you set for this user
(4): Enter the name of the database that you set up earlier
(5): Click Test Connection to ensure that the details you have entered are accepted. If the test fails, double-check everything carefully. To make sure that you have set up the database and the user correctly, you may need to look back at the database setup section and test the connection using the MySQL command line.
With the database connection configured, you can browse the objects in the database including the test table that we created earlier which you will find under schemas. Double-clicking the table will open a panel where you can view the table contents as shown in Figure 8.
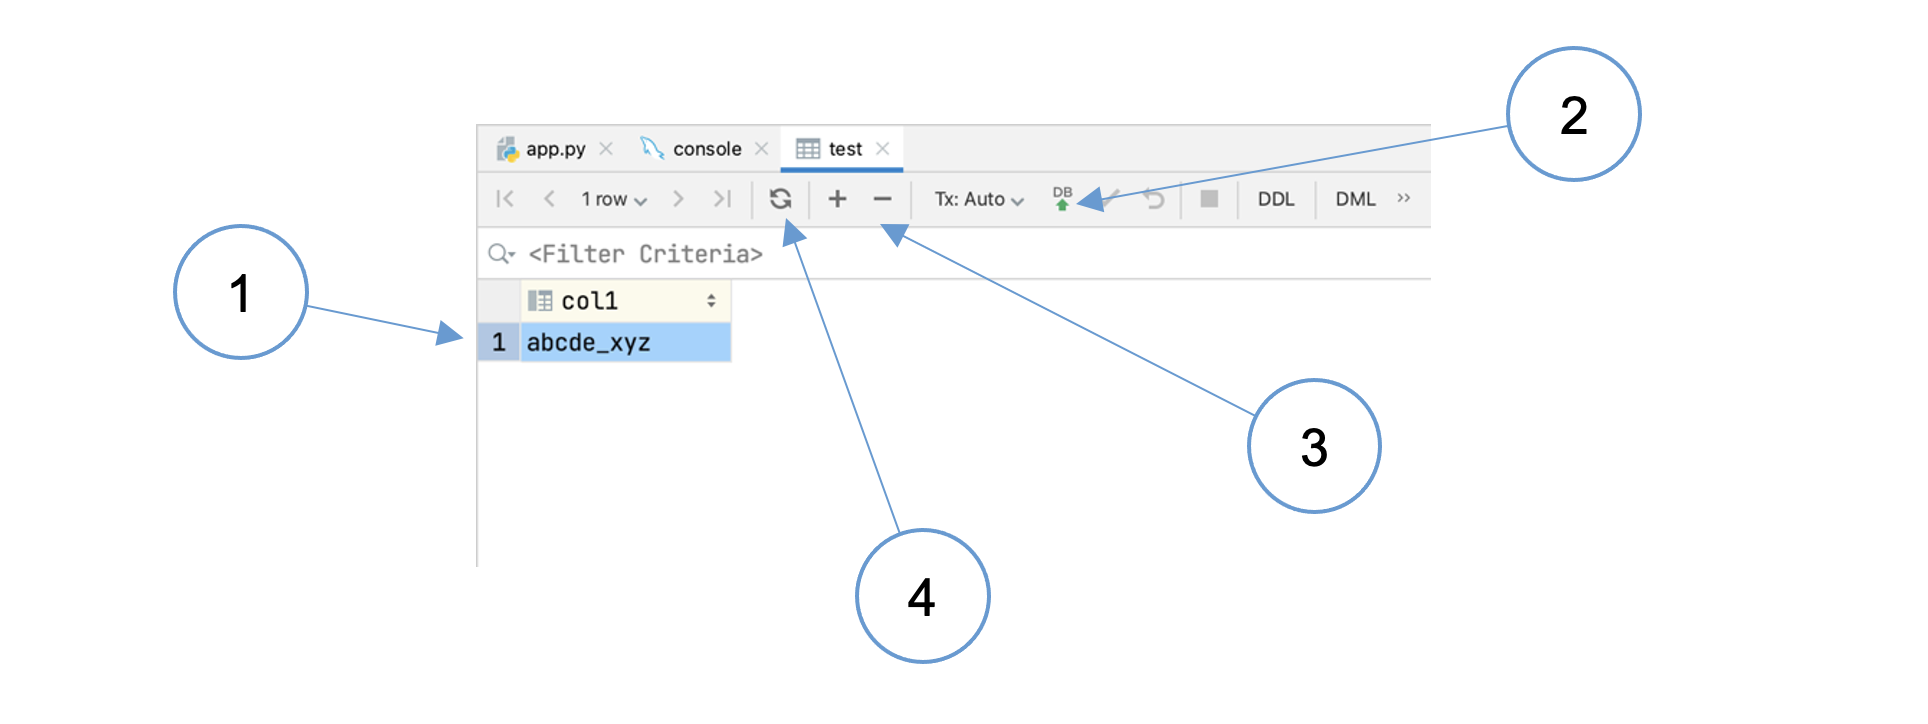
(1): The rows of data are shown in a grid. You can edit the data directly as illustrated here where the original value of
abcdehas been changed. After modifying the data, you need to exit from edit mode by hitting TAB or RETURN, or by clicking somewhere else.(2): To make any modification permanent, you need to click the commit icon.
(3): Rows can be added using the plus and minus icons. Again, changes are not permanent until you click the commit icon (2)
(4): The connection does not automatically refresh. If you are testing the application, for example, to make sure that it is creating the correct data in the database, you will need to click the refresh icon before changes become visible.
We will take the opportunity to remove the test data from the database. First, click the minus icon (3) to delete the single existing row, and then click the commit icon to make the change permanent.
Next, we will remove the table completely. In the Database panel, right-click the table and choose Drop from the pop-up menu. You will be asked to confirm the operation.
Summary
Just relying on the default functionality provided by PyCharm gets your Flask project off to a quick start. Making use of the integrated tools such as the terminal panel and the database integration means that you rarely have to leave the PyCharm environment because all the tools you need are in one place. Later parts of this tutorial will introduce further PyCharm settings to simplify the job of building applications.
 Using PyCharm with Anaconda