Models
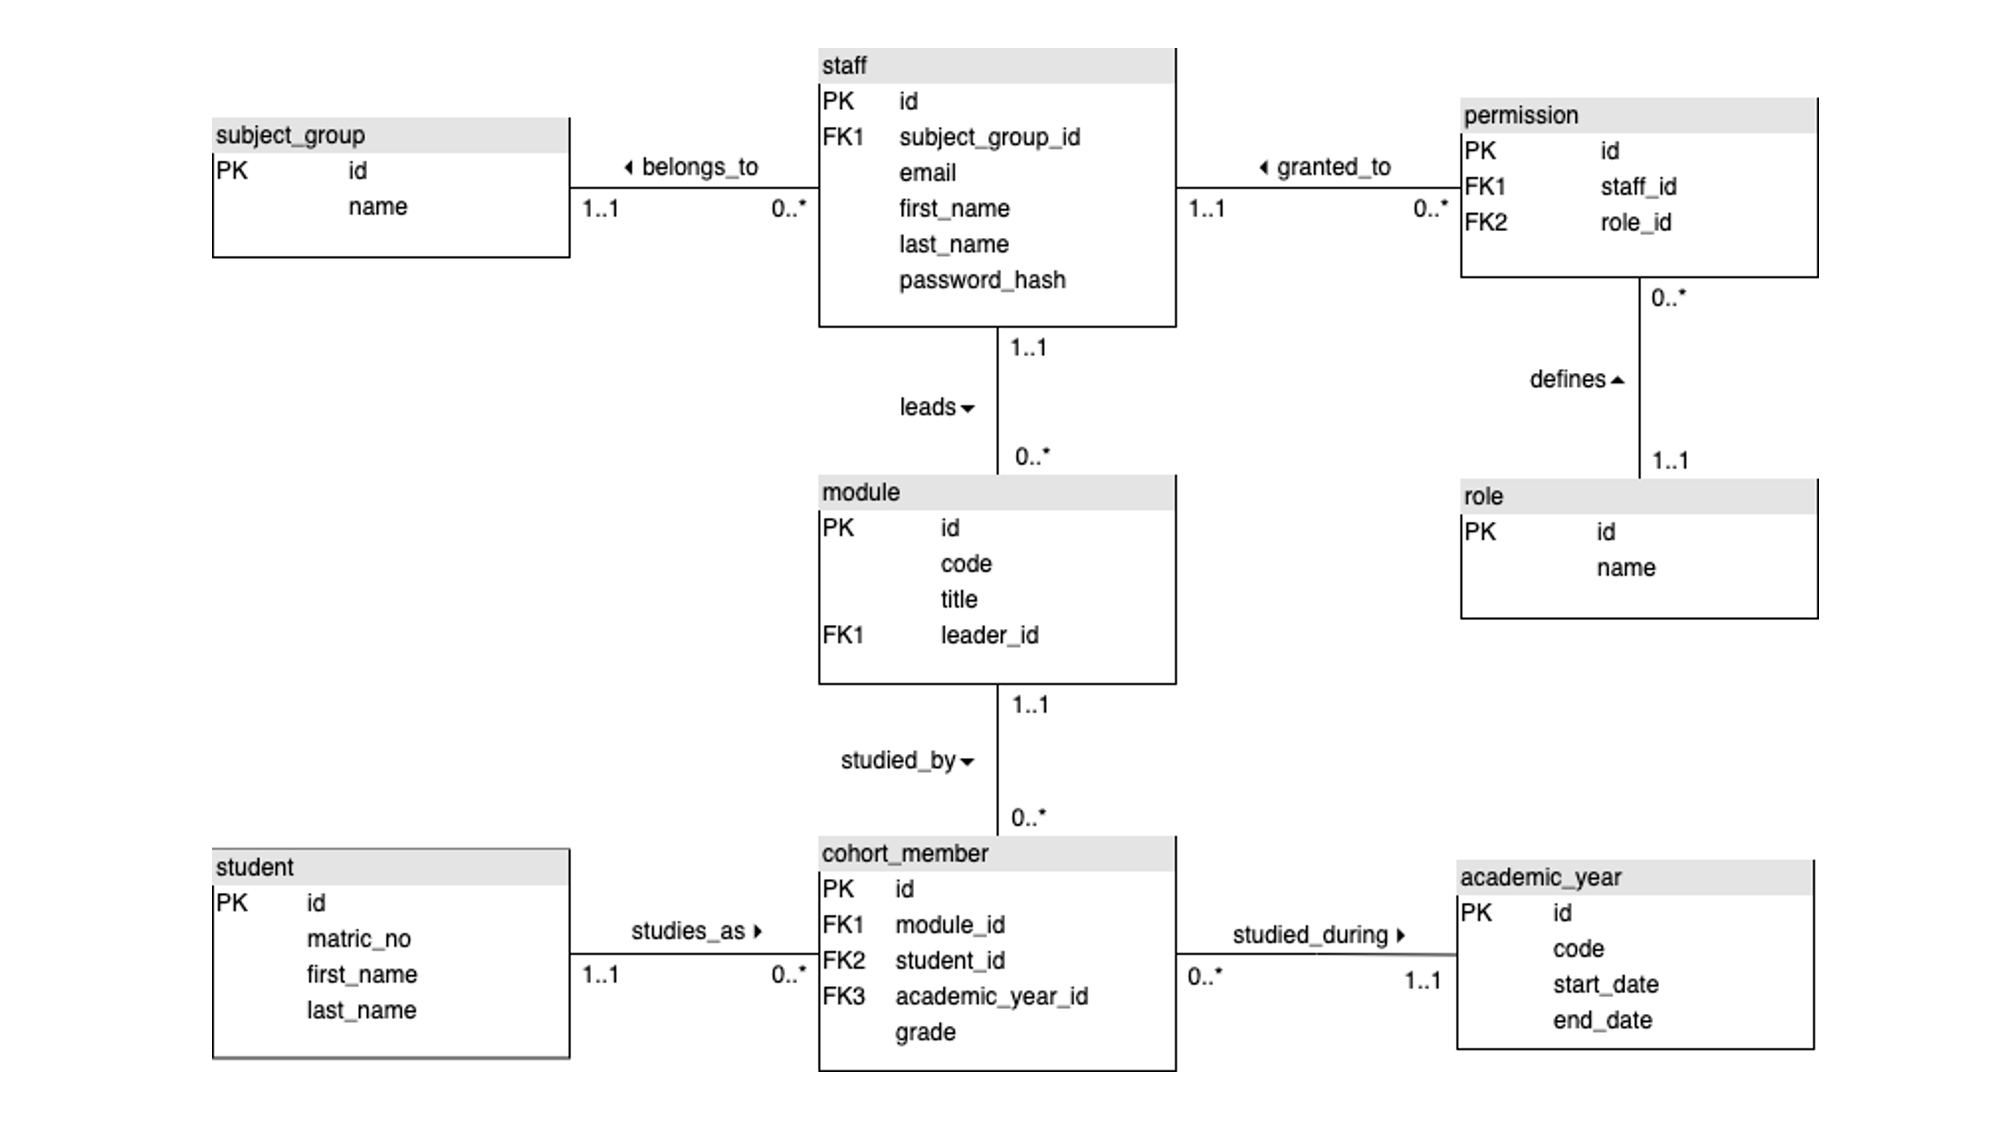
A model is an object representation of a database table. We will need a model
corresponding to each table in the ER diagram:
When adding a model to a Flask application, the workflow consists of defining the model in code and then calling a convenience script to create the corresponding database table. This process is called migration and helps to eliminate human error. The term migration is also used in other contexts such as when moving code changes from one environment to another, but with Flask it is applied only to database changes.
A first model
We will start by creating subject_group which is one of the simplest models in our context.
It has two properties:
- id: a synthetic primary key
- name: a string value representing the name of the subject group
Create a file called models/subject_group.py and paste in the following code:
1 2 3 4 5 6 7 8 9 10 11 | |
Explanation
Line 1: Import the
dbobject that was created in theapp/__init__.pyfileLine 4: Create a Python class to represent a subject group. Note that it is a subclass of the generic
db.Model.Line 5: Explicitly set the name to use for the corresponding database table
Line 7: Define the
idproperty. By default, this will create an interger column in the database table with theAUTO_INCREMENTproperty set. This means that key values will be generated automatically for new rows in the table.Line 8: Define the
nameproperty. The parameters define its maximum length to be 60 characters and require it to be unique and not nullable.Lines 10 - 11: The
__repr__()function defines the string representaton of an object of this class when it is rendered using the Pythonprint()function.
We have set up the directory structure of the project so that each model is defined in a
separate file. To ensure that it can be found by import statements, we need to turn the
models directory into a Python package and provide an explicit link to the model. This may
seem tedious, but the alternative would be to put all models into the same file. For simple
application, that might be manageable but forlarger applications it makes maintenance more
difficult. To make the modification, create the file models/__init__.py and add the following
code:
1 | |
Notice that the reference to the subject_group.py file starts with a dot to show that it
is located in the same directory as the current file, models/__init__.py.
Bootstrapping migrations
Migrations allow us to manage changes we make to the models, and propagate these changes to the database. For example, if we make a change to a property in one of the models, all we will need to do is create and apply a migration, and the database will reflect the change.
First, we need to install the flask-migrate package, which will handle the database migrations using Alembic, a lightweight database migration tool. Alembic emits ALTER statements to a database thus implementing changes made to the models. It also auto-generates minimalistic migration scripts which can be used to reverse database changes or repeat the same changes on a server.
Use the same procedure as before to install flask-migrate through PyCharm. Once that is done,
we also need to modify the app/__init__.py file as shown below.
1 2 3 4 5 6 7 8 9 10 11 12 13 14 15 16 17 18 19 20 21 22 23 24 | |
The changes are
Line 4: Import the
MigrateclassLine 18: Initialise a
migrateobjectLine 19: Import all models
The flask-migrate package gives us access to several commands including
flask db initwhich creates a migration repository in the current project directory tree. This command only needs to be run once.
flask db migratewhich detects model changes and creates a migration script.
flask db upgradewhich runs the migration script to propagate the changes to the database
These commands need to be executed at the command line with the appropriate virtual environment activated which is easy to do using the terminal panel in PyCharm. Open the terminal and run the first of the three commands:
1 | |
If you get a KeyError, check that you have set the terminal environment variables correctly
as described at the end of the introduction.
If the initialisation is successful, a directory called migrations will be added below the
project root. Next, execute the second command:
1 | |
The feedback messages should show that the new modelin subject_group.py has been detected
and that a migration script has been generated. The script can ve viewed in the
migrations/versions directory. To run the script, execute the third command:
1 | |
The effect will be to create the subject_group table in the database which you can view
using the database panel in PyCharm. Remember that you will need to refresh the panel contents
to see the changes.
Summary
Once migrations are configured, they make it very easy to keep your database up to date as long as a) you stick carefully to the workfow, and b) nothing goes wrong.
The workflow is:
- Update the appropriate Python model file
- If it is a new model, add it to the
models/__init__.pyfile - Run
flask db migrate - Run
flask db upgrade
Performing the equivalent migration on a server will be discussed in a later part of the tutorial.
There are several things that could go wrong. There might be some reason why a migration script
does not complete, for example. If the whole script fails, it may be sufficient to try the
flask db upgrade command a second time. However, in more serious cases, a script may be
partially successful. Running the migration a second time may not work because with each
migration, a version number is stored in the database in the table alembic_version. If that
value is updated even though there is a problem with the script, it may be impossible to
resolve automatically. You would need to sort the problem out manually taking care that the
version numbers match when you have finished. As a last resort, you can remove the migrations
folder and the database table and start again from scratch.
Note that the automatic migration feature will not detect
- changes to table names
- changes to column names
- constraints without explicit names
 Flask-Migrate