Create, Retrieve, Update, Delete
The four basic operations that can be performed on data are Create, Retrieve, Update and Delete (CRUD). An application which only implements these basic operations on database tables is referred to as a CRUD application. It provides a no-frills method for maintaining the data and can often be a good starting point for a more sophisticated development project.
This section illustrates a method for implementing the CRUD operations for the subject_group
table. This will allow us to combine some of the Flask features that have been covered already
and introduce some new ones, notably:
- Forms
- Database operations with SQLAlchemy
- Control instructions in templates
The examples developed in this section can be used later as templates for use with other tables. At this stage, we will not worry too much about presentation; that will come later.
Preparing the admin blueprint
Maintaining the data related to subject groups is an admin task, and it should therefore be
part of the admin blueprint. Here, we will go through a similar process as with the public
blueprint to link the blueprint to the application.
First, paste the following code into the file app/admin/__init__.py.
1 2 3 4 5 | |
The second step is to register the blueprint in the factory function. Add the following code
to the file app/__init__.py just after the corresponding lines for the public blueprint.
1 2 | |
Retrieving data
With this endpoint, we want to retrieve all the data from the subject_group table and
display it in an HTML table in the browser window.
Additionally, we need links which allow us to edit or delete an existing subject group and to add a new one. Once there is data in the table, the page should look like this:
 Figure 14. List page wireframe
We will be creating all of the endpoint functions in the file app/admin/views/subject_group.py.
To begin, create the file and paste in the following code.
1 2 3 4 5 6 7 8 9 10 11 | |
Explanation
Line 1: Import the Flask function to render a template
Line 2: Link this file to the blueprint
Line 3: Import the model that corresponds to the
subject_grouptableLine 6: Use a decorator to indicate that the function definition is associated with the admin route
/subject_groups, and that the httpGETmethod is allowedLine 7: Define the endpoint function
Line 8: Populate the
subjectgroups variable with results of a SQLAlchemy queryLines 9 - 11: Return the rendered template
subject_groups.html. Note that two parameters are passed to the template.
The SQLAlchemy query syntax becomes familiar after a while. For more information, see the SQLAlchemy reference documentation.
Presenting the data
Before we can test the new endpoint, we need to create the template that is referenced at
line 9 in subject_group.py. Jinja2 templates can make use of css and javascript to improve
their appearance and behaviour, but for the time being we will just do a minimal job.
It is helpful to group templates according to the blueprint they relate to, so first create
a new directory called admin under the main templates directory. Then create the file
templates/admin/subject_groups.html and paste in the following code.
1 2 3 4 5 6 7 8 9 10 11 12 13 14 15 16 17 18 19 20 21 22 23 24 25 26 27 28 29 30 31 32 33 34 35 36 37 | |
The interesting parts of this template are the use of a condition at line 9, and the use of
a loop at line 19. Notice the syntax for embedding control statements into a jinja2 template
uses a combination of curly braces and percent signs: {% ... %}.
The condition at line 9 tests to see whether rowdata contains any data. If no data is
returned by the SQLAlchemy query, the return value is actually an empty list. This evaluates
to a Boolean False value, and so the condition fails and the else branch at line 28 is
followed. The condition is finally terminated at line 32.
The code at lines 10 - 27 generates an HTML table from the contents of rowdata. Lines
12 - 17 set up the header row, and then lines 19 - 24 add a new HTML row for every database
row.
The code at lines 22 and 34 contains text placeholders for the links that will allow the user to access update, delete and create functions. These are developed below in parallel with the corresponding functions.
Test run
The application needs to be restarted for the changes to take effect, and the new endpoint
can be accessed at http://127.0.0.1/subject_groups. Because there is no data in the table
yet, you should only see the No data found message defined at line 30.
Creating new records
For the Create operation, we will need to add a new endpoint to the file
app/admin/views/subject_group.py and a new template to define the layout of the page.
In addition, we will need to define a web form to enable the user to input the attribute
values for the new subject group. The form will also be used when we need to update the
data.
Adding a form
We will be using the Flask-WTF extension to handle form definitions for us. The extension provides integration with WTForms.
The first task is to add the flask-wtf package to your virtual environment.
Next, create the file app/admin/forms/subject_group.py and paste in the following code.
1 2 3 4 5 6 7 8 | |
Explanation
Line 1: Import the parent
FlaskFormobject class. This provides properties and behaviours common to all forms.Line 2: Import the two field definitions required in this form.
Line 3: Import a field validator - we will use this one to ensure that the user enters a value for the
nameproperty. Flask-WTF has a number of validators that make writing forms much easier.Line 6: Define the form class which subclasses
FlaskFormLine 7: Define the
namefield.Line 8: Define the
submitfield which is rendered as a form submission button.
The form is initialised in the code for the new endpoint which is shown below. Paste it into
the file app/admin/views/subject_group.py after the existing contents.
1 2 3 4 5 6 7 8 9 10 11 12 13 14 15 16 | |
Explanation
Line 1: Notice that this endpoint definition allows the
POSTmethod to be used.Line 3: Initialise the form object
Line 4: This convenience function will check if it is a POST request and if it is valid. When the user clicks the
submitbutton, the form data is posted to the same function.Line 5: Create a new
SubjectGroupobject and intialise it with the data from the form.Lines 7 - 8: Add the new object to the database session and commit the changes to the database - see below for further details.
Line 12: After successfully adding a new record, return to the list page
Lines 14 - 16: Return the rendered template passing the form in as a parameter.
The database session is a buffer space that SQLAlchemy maintains for communicating between the application and the database. All currently active objects are tracked in the session so that changes can be recognised. Because in this case we are creating a new record, we have to add it to the session explicitly. Records that are the result of a query are added to the session automatically.
The database operations are enclosed in a try: ... except: statement. This ensures that
if there are any errors when updating the database, the session is not corrupted.
Initially after adding this code, PyCharm will highlight some errors with red underlining.
This is because we are referencing some external objects that need to be explicitly imported.
There are two new Flask functions that need to be imported along with render_template. Change
the existing import statement to
1 | |
Then add the following lines immediately after the existing import statements.
1 2 3 | |
Explanation
Line 1: Import the database connection that was defined in the factory function.
Line 2: Import the model
Line 3: Import the form
Presenting the data
Finally, we need to define the new template. Create the file
app/templates/admin/subject_group.html and add the following code.
1 2 3 4 5 6 7 8 9 10 11 12 13 14 15 16 17 18 19 | |
Explanation
Line 11: Start the HTML form and set the action to the request URL - i.e. post the form data back to the same endpoint.
Line 12: Include the automatic CSRF token field. Without this the form will fail validation.
Lines 13 - 14: Render the fields defined in the form.
Enabling the New button
We now have everything needed to create and view subject group records. We just need to
ensure that the add_subject_group endpoint is activated when the user clicks the New
button on the list page. This is simply a question of turning it into a hyperlink.
In the file app/templates/admin/subject_groups.html, replace the plain text New at line
34 with the following:
1 | |
Notice that the function url_for can be used in jinja2 templates as well as in Python code
to generate the correct URL for an endpoint.
Test run
After restarting the application, you should be able to go to the URL
http://127.0.0.1/subject_groups where you will see the No data found message. However,
you can now click the New link at the bottom of the page to call the add_subject_group
endpoint.
Enter a subject group name and click Save. This should store the new record in the database and return you to the list page where you will see your new subject group in the table. Remember that you can also view the data by using the database panel in PyCharm. This can be useful when debugging to compare the data on your application page with what is actually in the database.
Deleting records
The process of deleting a record is quite simple compared to creating a new record. No
template is needed, for example, because we do not need to interact directly with the
stored values. On the other hand, we do need to identify the record to be deleted. This is
achieved by embedding the primary key of the database record into the Del link on the
list page. When the user clicks the link, the key is passed to the delete_subject_group
endpoint which deletes the record and retunrs to the list page.
Adding the endpoint
Paste the code below into the file app/admin/views/subject_group.py after the code that
is already there.
1 2 3 4 5 6 7 | |
Explanation
Line 1: The route is defined as usual expect that it includes a variable. The string
<int:id>indicates that there will be an integer parameter at the end of the URL and that its name isid.Line 2: The endpoint function must take a parameter with the same name as the one passed in via the route.
Line 3: If the record is not found, a 404 error is raised
Enabling the Del link
The current version of the list page template has a placeholder for the deletion link. Here
we replace the placeholder text with a hyperlink which includes a reference to the primary
key of the record. Replace the content of line 22 of app/templates/admin/subject_groups.html
with the following:
1 2 3 4 | |
Notice that the url_for() function has a second parameter which corresponds to the one
defined in the route. Its value is set equal to the id property of the row variable,
and the row variable is the current record in the loop.
Test run
Restart the application and refresh the list page in the browser. The Del links should all now be active. Click one to remove one of the displayed records.
Updating records
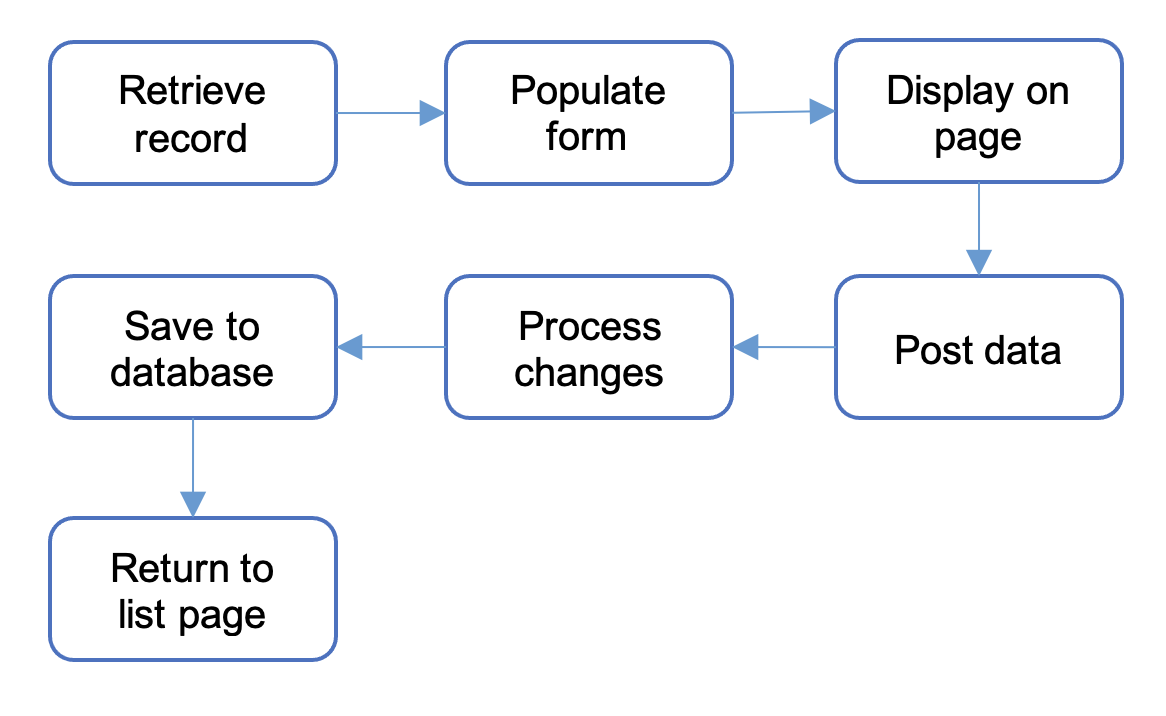
The implementation of the update operation builds on the features of the create and delete operations. The sequence of actions is shown in Figure 15.
Add the following code to the file app/admin/views/subject_group.py.
1 2 3 4 5 6 7 8 9 10 11 12 13 14 | |
Explanation
Line 1: The id of the record is passed as a parameter.
Line 4: The form is populated from the
subject_groupobjectLine 7: The object is updated with the modified values posted from the form
Enabling the Edit link
In the file app/templates/admin/subject_group.html, change the text Edit at line 23 to
1 | |
Test run
You should now be able to view, edit and delete existing records in the database, and add new ones. Well done! You have implemented a simple CRUD application.
 What is CRUD?