Testing
Integrated testing is a fundamental part of agile software development. It needs to be done systematically and in such a way that you can repeat your tests easily. Informal testing, where the developer selectively tries a few operations from time to time, is not a reliable way to ensure your code is working.
Systematic testing involves implementing individual tests in code and defining specific and repeatable conditions under which the test should pass. Tests created this way are known as unit tests. The contextual conditions are also defined in code and are called fixtures.
pytest
You could implement your tests from scratch if you really want to, but there are
several packaged options that make things easier. In this tutorial, we will be
using pytest with the additional
pytest-flask-sqlalchemy plugin.
Both of these packages can be installed using conda or through PyCharm.
Test location
The default location for test files, known as the test root, is a directory called
tests under the main app directory. You need to create this directory manually.
Fixtures
A fixture defines part of the running app that is required for certain things to work. For example, in a piece of Flask code you may often need to refer to the app itself, or to the database connection via the db object. Fixtures allow you to define these elements once and then share them with tests that need them.
Shared code for pytest is placed in a file called conftest.py which is located in
the test root directory. If you create subdirectories to keep your tests organised,
tests in a subdirectory can still make reference to the fixtures in the root-level
conftest.py file, and in addition, you can create a directory-specific conftest.py
with further fixtures just for that set of tests.
The example below shows a basic conftest.py file that makes a good starting point.
You can add further fixtures as needed as you create more tests.
1 2 3 4 5 6 7 8 9 10 11 12 13 14 15 16 17 18 19 20 21 22 23 24 25 26 27 28 29 30 31 32 33 34 35 36 37 38 39 40 | |
Explanation
Line 1: Import pytest
Line 2: Import the app factory function (from
__init__.py)Line 3: Import all models - see the note for line 15
Line 6: Fixtures a prefixed by the
@pytest.fixture()decoratorLine 8: Create the app using the production configuration. This can be changed and you may decide to define a configuration specifically for testing.
Lines 9-12: Redefine configuration parameters for testing. Line 11 tells the app to use an empty database for testing rather than the one you are using for development.
Line 14: The
with...construction ensures that the app context is available and consistent across all lines of code in the block. Without it, for example, thedbvariable would not be available at line 15.Lines 15-17: Set up all of the tables using the defined models.
Lines 19-27: Here it is important to set up any data that is required for the app to work. For example, you will need to create a user record in order to run most tests.
Line 29: The
yieldcommand is likereturnexcept that the current function does not terminate. Instead, it suspends operation so that when the yielded variable is no longer in use, code execution continues from where it left off.Lines 31-33: After the test has completed, the database objects are removed leaving the database empty and ready for the nest test.
Lines 38-40: The second fixture defines a
clientobject that can be used to make requests to the app.
NB.: If you are building an API that expects a JSONRequest rather than an
ordinary Request, you will need to push the application context in the client
fixture. In that case, the code would be as follows:
1 2 3 4 5 | |
PyCharm integration
While it is possible to write a test by navigating to the appropriate directory and creating the test file manually, PyCharm provides some features to simplify the process.
PyCharm integration requires some configuration values to be set. When you install
pytest, for example, PyCharm attempts to detect your choice of test runner
automatically; however, it does not always do so reliably. To fix this issue, change
the test runner setting in the Tools → Python integrated tools dialogue in the
PyCharm preferences/settings from Autodetect (pytest) to pytest.
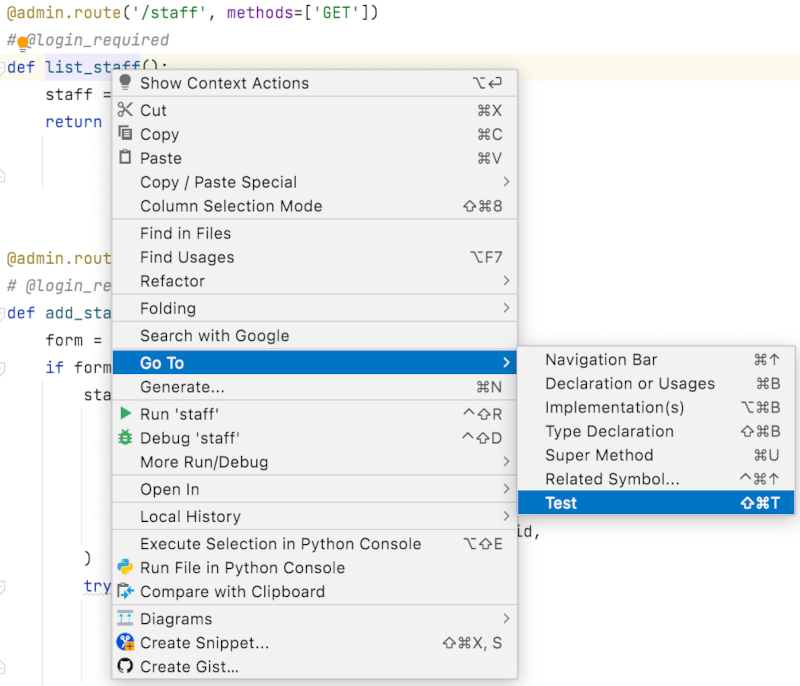
One of the easiest ways to create a test for a piece of code in PyCharm is to right-click on the relevant function in the code editor and to choose Go to → Test from the context menu as shown below.
If a test already exists for the function, PyCharm will open it immediately. Otherwise, you will be prompted to create a new test. Choosing that option opens the dialogue shown below.
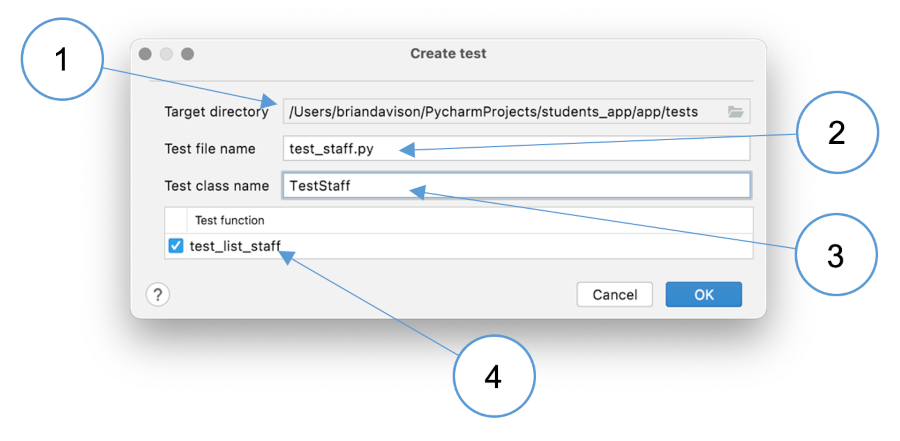
(1): PyCharm should automatically identify the test root directory as the target location. NB.: If there is another directory called
testsor any other kind of ambiguity, you may need to change the value in this field.(2): PyCharm suggests a name for the new file. Initially, you can accept the default, but later on it may be convenient to place related tests into the same file.
(3): This field is not populated automatically, but enclosing your tests in a class can be convenient for running multiple tests in a single operation.
(4): Depending on the part of the code you right-clicked, you will get a list of items for which you can create tests. If you clicked on a function, there will only be one option, but if you clicked on a class you will be offered the opportunity to create tests for each of its methods.
Writing a test
The default test created by PyCharm contains minimal code and the test is set to fail as shown below.
1 2 3 | |
Line 1: The test class
Line 2: The test itself
Line 3: Statement that fails without any further processing
Tests rely on a comparison between the expected and actual outcome of a piece of
processing. This is done using an appropriate variation of the
assert command.
In this case, the list_staff() function is expected to return a
rendered template that lists all staff in an HTML table. If you know that there
is one staff record in the database for Alice Amery, you could check that the
rendered HTML contains that name by using the statement shown below.
1 2 3 4 5 | |
Running a test
When viewing test code in PyCharm, you will see a green triangular icon in the left-hand gutter. You can click this icon to run the relevant test. When you click it, a menu of options is displayed. The first one should start with Run pytest for.... If it says anything else, PyCharm may be picking up the wrong test runner. To fix the problem, make sure you have explicitly set the test runner to pytest rather than Autodetect (pytest) as described above, and also delete any run configurations that PyCharm created for your tests. You can do this with the Run → Edit Configurations... menu.
 PyTest reference