Nginx
Apache remains the default web server that comes bundled with many Linux distributions. However, Nginx is an alternative web server that offers some advantages, especially in the area of speed and scalability. A detailed comparison of the two applications can be found on several web sites including this one from Sumo Logic.
Prerequisites and assumptions
- You already have a Flask application set up
- You are using a virtual environment - here we assume it was created using Anaconda
General overview
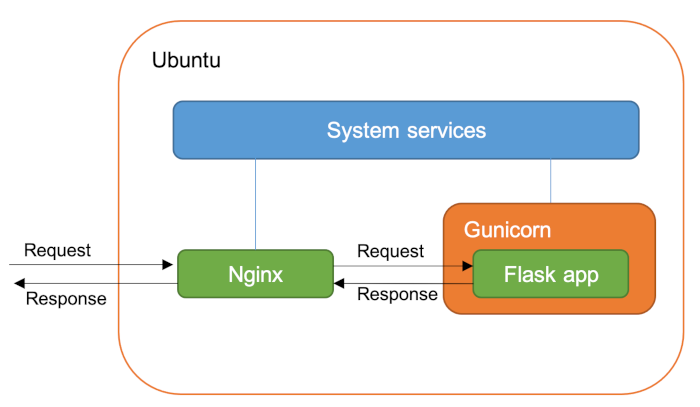
When running a Flask app under Apache, it is launched as a WSGI process at the same tie as the
web server. With Nginx things are slightly different. The Flask app needs to be started
separately and Nginx then directs any incoming requests to the Flask process. The setup is very
similar to running the Flask app during development. Flask comes bundled with a basic application
server that you can start with the command flask run, or by running the app through an IDE like
PyCharm.
The Flask development server is not designed to be robust enough for production environments,
and so you need to use an alternative such as Gunicorn. It may be
convenient to configure your Flask app as a service that be started and stopped using the
standard Linux service command. In that case, you could make updates to your app and restart
it independently of the web server. This configuration will be described on the rest of this
page. It is summarised in the diagram below.
Installing Nginx
Nginx can be installed using the standard Ubuntu command shown below. It is always a good idea
to update the apt command itself before using it to install new packages.
1 2 | |
If you are running your own server, you will need to tell the firewall to allow access to Nginx with the command
1 | |
If you are running on a controlled server (such as one managed by a university), the firewall may be controlled centrally and you may have to request that ports 80 and 443 be opened for you.
You can now test the installation by typing your server address into a web browser. If you previously had Apache installed and running, you should stop and disable it with the commands
1 2 | |
If your /var/www directory was previously empty, a default index.html page will be created.
If there is already an index.html page in existence - for example, left over from an Apache
installation - it may not be overwritten by the Nginx installation. When you test the server
you will either see a Welcome to nginx! message, or the contents of the pre-existing
index.html page.
Gunicorn
Gunicorn is installed as a Python package. Activate the virtual environment used by your app and install Gunicorn using the standard command. Assuming you are using Anaconda, that is
1 | |
If you are using the default Python installation for your operating system, the command might be
1 | |
You can check that Gunicorn can run your app at this stage. First, ensure that your app runs independently by activating the development server. Before you can do that, you will need to export the environment variables shown below
1 2 | |
NB.The values shown here are the ones used throughout this site. If you are recycling an app from elsewhere, the values you need to export may be different.
You should now be able to run your app with the command
1 | |
This will run the app on port 5000 by default as indicated in the feedback message that is shown:
1 2 3 4 5 6 | |
If port 5000 is open, you can connect to the server and access the app. However, if port 5000 is not under you control, you will have to accept the informati0n in the feedback message as confirmation that everything is working. You can stop the app again by pressing CTRL-C.
Check that you can replace the development server with Gunicorn by issuing the following command
1 | |
Here, run is the name of the script used to start your app (run.py), and app is the name
used for the Flask instance. Set the workers value to the number of cores available on your
server.
If you see some feedback like the following, the operation was successful.
1 2 3 4 5 6 7 | |
Again, you can stop the application server with CTRL-C.
Creating a system service
Turning your app into a Linux service means that you can control it using the standard commands:
1 2 3 | |
(NB. service in this context is the same as systemctl, but easier to remember)
Service definition files are stored in the directory /etc/systemd/system/. The example below
covers the most common requirements for a Flask app. Save it (with appropriate modifications) with
the name myApp.service.
1 2 3 4 5 6 7 8 9 10 11 12 13 14 15 16 17 18 | |
Explanation
Line 2: The name of your service
Line 3: Ensures that this service starts after the network has been enabled
Line 6: Sets the working directory to the location of your app code
Line 7: Sets the path. The example assumes that you have an Anaconda environment called
myAppLines 8 & 9: The sme environment variables that were used before
Line 10: The command to start the Gunicorn server - see the note on the port number below
Lines 11-18: Common settings for Linux services
Note that the Gunicorn command specifies port 9000. This is actually and arbitrary choice. 9000 is chosen simply because it is different from the default 5000 as an extra security precaution.
Once your service file is saved, you should be able to start the service with the standard command
1 | |
If anything goes wrong, you should see an error message. Otherwise, you can check that the service started successfully with the command
1 | |
This command lists active processes pertaining to Gunicorn. If the service is running correctly, you should see output similar to the following (long paths have been shortened).
1 2 | |
Configuring Nginx
Finally, we need to tell Nginx to pass app requests to the Gunicorn process. This is done through
a configuration file in the directory /etc/nginx/sites-available. Nginx uses the same folder
conventions as Apache. Copy the content below into a file called myApp.
1 2 3 4 5 6 7 8 9 10 11 12 13 14 | |
Explanation
Line 2: The underscore here is a wildcard. You should use the domain name instead
Line 4: The root directory of your app
Lines 6-8: An instruction to serve static files (eg images, scripts, etc) from the directory shown
Lines 10-12: An instruction to pass any incoming requests to the process on port 9000 (Gunicorn)
Unlike Apache, Nginx does not provide handy commands to enable and disable sites. You will need to
modify the contents of the sites-enabled directory manually.
First, change into that directory and show a detailed list of the directory contents:
1 2 | |
You should find that there is only one item - a symbolic link to the default file in the
sites-available directory:
1 2 3 | |
You need to remove that link and create a new one pointing to your new configuration file. Use the following commands:
1 2 | |
Nginx is now configured. You should be able to restart it with the command below and access your app through a web browser on the standard port 80.
1 | |
You will probably need to run your app using https which requires changes to this configuration file. A good option for obtaining a security certificate is CertBot. The site provides clear instructions to follow to obtain and install a certificate. The installation process makes most of the changes to the configuration file automatically.