Using the SQL Developer GUI
SQL Developer makes many database maintenance operations easy. Creating new tables is no exception and in this part of the practical you will see how straightforward it is. However, the graphical tools are not always the best choice and sometimes you can greatly streamline the process of schema maintenance by using tools that give you more control. Later, for example, you will create a schema maintenance script using the other features of SQL Developer that you have already seen.
For this exercise, you will be creating the genus table from the sightings scenario. To remind you, the table definition
looks like this:
1 | |
Select datatypes
The table below illustrates some of the data that will need to be inserted into genus. Example data lets you identify
an appropriate datatype for each column. Certain datatypes also require you to specify a length in column definitions.
In those cases, the example data can also help you to select an appropriate value.
| family | genus |
|---|---|
| rhinocerotidae | diceros |
| hominidae | pan |
| felidae | panthera |
| ursidae | ailuropoda |
| canidae | canis |
| pteropodidae | epomops |
In this case, all the data is alphanumeric text, and the appropriate Oracle datatype is therefore VARCHAR2. Recall that other databases use different names for equivalent datatypes.
If we have access to the complete dataset, we could identify the longest string in each column, and we could set the
column lengths to match. Looking at the data available, the longest text string visible is rhinocerotidae in the
family column with 14 characters; however, it is not clear whether this is a representative length or not. To be sure
in this case we should include some additional capacity to accommodate longer strings. The data values in the genus
column will probably be of similar length, and so we can use the same datatype specification for both columns.
An appropriate datatype for these two columns would therefore be VARCHAR2 (25)
Identify keys and constraints
genus is identified as the primary key in the schema description because it is underlined. There are no other keys.
From the schema description, it is not possible to tell whether any other constraints are required; however, looking at the example data you can see that there are no null values. Referring to what you may already know about the naming of animal species, you may be able to say with confidence that since a genus is always part of a family, both columns should be declared to be not null.
Creating the table
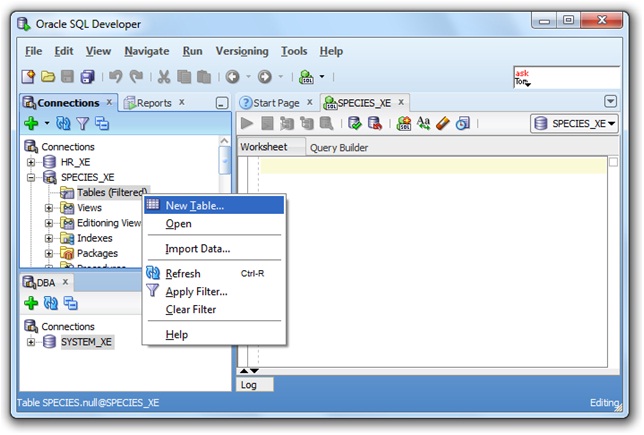
In SQL Developer, right-click the Tables branch of the appropriate connection as shown below and choose New Table... from the pop-up menu.
When the dialog appears, you can fill in the details that you have prepared. Referring to the graphic below,
enter the table name (1), then complete the details for genus as the first column. Fill in the Column Name (2)
and set the Size to 25 (3). Notice that VARCHAR2 is the default datatype. Because genus is the primary key, you
can leave the Not Null checkbox empty (4); it will be updated automatically when you check the Primary Key checkbox.
This is because a primary key column must always contain a value; otherwise there may be rows that cannot be identified
individually.
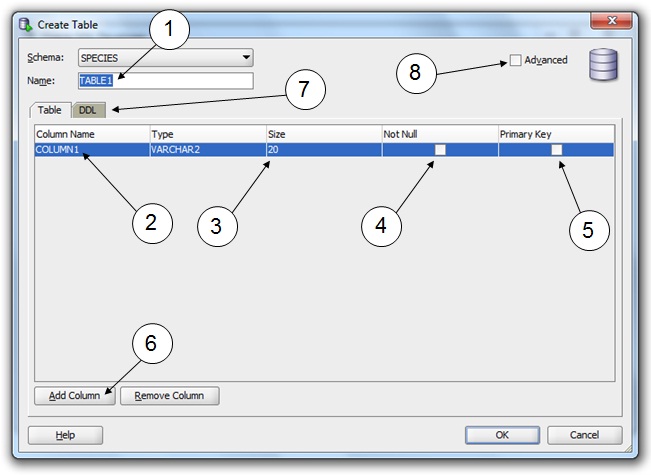
When you have completed the definition of genus, add a new column by clicking the button (6) and fill in the details
for family. This time you will need to check the Not Null checkbox (4).
Before you complete the table creation by clicking OK, click on the DDL tab (7). Here you can see the SQL statement that has been generated from your input. Take a little time to understand what each line of the statement means:
1 2 3 4 5 6 7 8 9 10 | |
Lines 1 and 2 are self-explanatory.
Line 3 defines the column genus, but does not mention that it is the primary key.
Commas are placed at the beginning of lines rather than the end. This is a convention that is used in some organisations because commas at the end of lines can easily be forgotten whereas at the beginning, they all line up. If one is missing it is easier to spot.
Line 4 defines the column family.
Line 5-9 define the primary key constraint for this table. Notice that it occurs in a comma-separated list with the column definitions. The enable keyword at line 9 ensures that the constraint is active as soon as the table is created. This is actually the default, and so this keyword is not actually necessary.
Line 10 completes the column list with the right parenthesis and the whole SQL statement with the semicolon.
Using the New Table... dialog therefore greatly simplifies the job of writing DDL, and some people prefer to enter data this way and copy the DDL that is generated for use elsewhere. Note however that only a minimal set of options have been presented. In the lecture we mentioned a number of other types of constraint that might form part of a table definition. You can access options for these by clicking the Advanced checkbox (8). Take some time to look through the available options. In a moment, you will add a related table so that you can see how foreign keys are defined.
For the time being, complete the creation of genus by clicking OK.