Using Excel
Excel shortcuts
CTRL+click: Multiple select
CTRL+
SHIFT+
SHIFT+CTRL+
CTRL+D: Copy value of current cell down to other selected cells in the same column
CTRL+R: Copy value of current cell rightwards to other selected cells in the same row
Problem characters
Apostrophes are just single quote characters which indicate the start and end of text strings. To force Oracle to read them as ordinary characters, double them:
1 | |
Ampersands in scripts indicate substitution variables. To force Oracle to interpret them as ordinary characters, add the following control statement and prefix the ampersand with a backslash:
1 2 | |
Using Excel
We are now going to use some of the standard features of Excel to transform the columns of data into a set of
insert statements that can be used to populate the genus table. There are two things that will make this a very
quick and easy process:
- Knowledge of insert statement syntax (which you now have)
- Familiarity with standard Excel operations (which you may or may not have)
One of the main points about this exercise is that although Excel is a standard office application, it can be extremely useful for handling data if you have a good knowledge of its operations and shortcuts. The box on the right summarises some of those that are useful for completing the preparation of your DML script.
Thinking about the structure of an insert statement, there are two components: a set of SQL keywords and object names which are the same in every new row and a set of values which are different for every row. At present, the spreadsheet contains only the values, so the task is to add the standard text in between them. Get the first row correct, and the unchanging text can be copied down the Excel columns in a single operation regardless of how many rows there are. Follow the steps below to complete the operation.
Insert a blank column between the two columns of data, and another before the first column. Your data should be laid out as shown below.

Notice that the first row contains the column names. In cell A2, enter the following piece of text:
1 | |
Notice that this is only the first part of the insert statement, and that the final single quote is the opening quote for the first value.
Following the value in column B, we need to close the quotes, add a comma and open the quotes for the next value. In Excel, a cell value that starts with a single quote has a special meaning. Specifically it prevents Excel from evaluating a formula, and it is not displayed in the cell. If you want a value that really does begin with a single quote, the solution is to double it so that the first acts as the Excel control character, and the second is the beginning of the actual cell value. In cell C2 therefore you need to type the following:
1 | |
That is, quote, quote, comma, space, quote.
The final part of the insert statement needs to be entered into cell E2. Here you need to close the single quote, add the final right bracket and end the statement with a semicolon as shown below. Don't forget that the first quote must be entered twice.

To complete the insert statements on all the other rows, you need to copy the values in cells A2, C2 and E2 down to every other row in the data. Doing this with the mouse is fiddly, so you can use some of the shortcuts listed above to do this:
-
Remove the first rows containing the attribute names
-
Select columns A, C and E by clicking their headers while holding down the CTRL key
-
Press CTRL+D to copy the values from the first row down to all other rows in the spreadsheet
-
Place your cursor in column B, and press CTRL+
to navigate to the bottom of the block of data -
Highlight the first row below the end of the data
-
Press SHIFT+CTRL+
to highlight all rows below the selected one -
Remove the unnecessary text by pressing DEL
The DML statements in the spreadsheet now need to be saved as a text file so that they can be run at the SQL*Plus command line. Again, the Excel shortcuts make this quite easy:
-
Highlight cells A1230 to E1230 (the last row of data)
-
Press SHIFT+CTRL+
to highlight all rows above the current one -
Copy the data highlighted data
-
Open a new text file with your text editor and paste the data into a new file
The final step before the script file is completely ready is to remove the TAB characters that are automatically inserted by Excel. In Notepad++ you can choose Replace... from the Search menu and perform a global search and replace as shown in the graphic below.
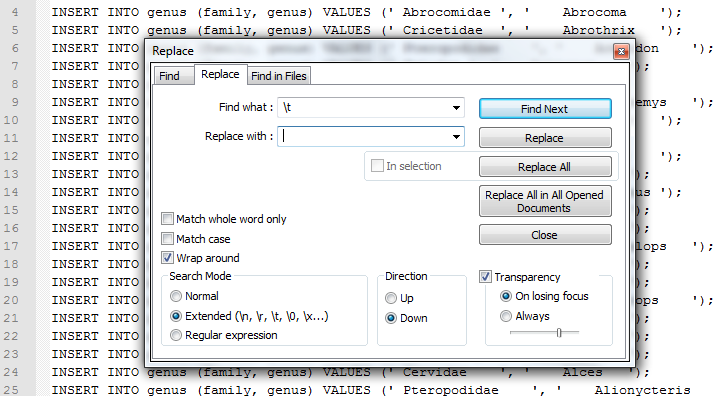
The string \t shown in the Find what: field in the dialog is a special string that represents a TAB character.
For this to be recognised correctly you must be using the Extended mode as indicated in the bottom left-hand corner
of the dialog. The Replace with: field is left blank showing that the TABs should be removed but not replaced with
anything. You can then click the Replace All button. You will see a message saying that 4920 replacements were made,
and on clearing the remaining dialogs, you should see that the script is now ready to run.
If you are using a text editor other than Notepad++, you should find that there are equivalent operations that allow you to replace TAB characters.
When you have completed these steps, try running your script in SQL Developer. If there are errors try to work out what the problem is and make your corrections.