Simple LED output (Blink)
Summary
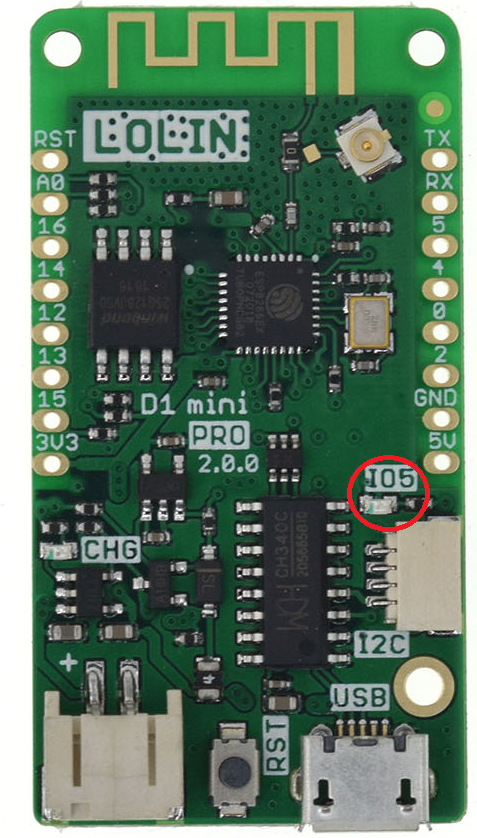
This is one of the simplest exercises for microcontrollers, because there is a built-in LED on the board (it is named IO5, and you can see it in the image - click to enlarge). For the first part of the tutorial we will be using only our board. For the second part of the tutorial we will be looking how to make an external LED blink. For this tutorial you should have micropython flashed on you board, so if you didn’t complete the first tutorial you should do it before you proceed to this tutorial. Since we will be using micropython, we will be using PuTTY to communicate with our board.
Requirements
- 1 x lolin D1 Mini Pro board
- 1 x Micro USB
- 1 x Breadboard
- 1 x LED
- 1 x Resistor 1k ohm
- 3 x cables
Board LED Blink
Connect your board to your computer
This step should be easy if you completed the first tutorial.
-
Connect the one end of your micro usb on your board and the other end to your computer
-
Open PuTTY and select Serial connection type
-
Use the appropriate Serial Line COM5 (same you did in the Blink tutorial. If you don't remember it you can find it through device manager) and speed 115200 and click open.


Input commands
Now you should be looking at the PuTTY terminal. First thing we must do, is check that the LED is working properly.
-
Use the following command to light up the on board LED
1
2
3
4
from machine import Pin led = Pin(2, Pin.OUT) led(0) -
To turn off the LED, use the following command
1led(1) -
To make the LED blink 10 times with half a second delay with the following command
1
2
3
4
5
6
7
8
9
from machine import Pin
import time

for i in range(10):
    led(1)
    time.sleep(0.5)
    led(0)
    time.sleep(0.5)
    led(1)
NOTE: If you are doing copy & paste you must use the mouse right click to paste the code. I would suggest typing the code by yourself to avoid any issues and for better practice.
External LED Blink
When connecting external components to your breadboard you should remove the micro usb for safety, and to avoid any damage on your components.
-
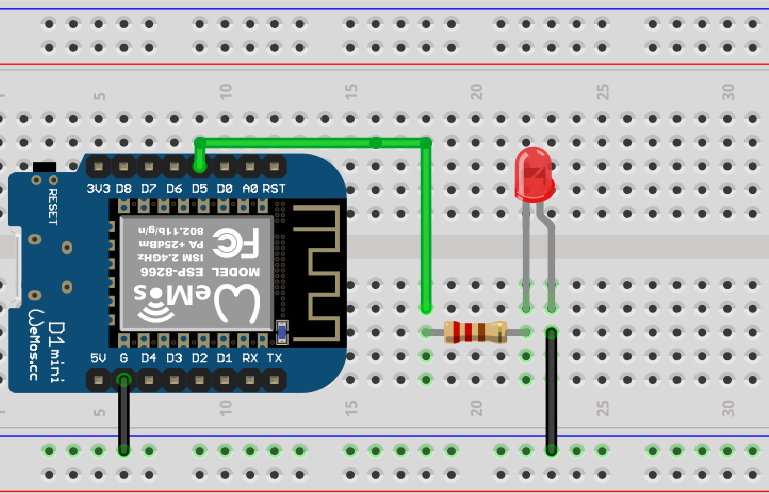
Connect the LED and resistor on your breadboard following the circuit you can see on the image below.
-
Instead of D5 on our board the name of that pin is 14.
-
Connect your board back on the computer using the micro USB.
-
Connect PuTTY with your board once again. (you will be doing this frequently, so you should start getting familiar with it by now)
-
Using the following lines of code you will make the external LED Blink.
-
Notice that we used the import commands once again since we disconnected the board from PuTTY before, the rest are quite like the previous the only difference is that we changed the name of the pin we used for the LED.
 1
 2
 3
 4
 5
 6
 7
 8
 9
10
from machine import Pin
import time

led = Pin(14, Pin.OUT)
for i in range(10):
    led(1)
    time.sleep(0.5)
    led(0)
    time.sleep(0.5)
    led(1)
This is the end of Tutorial 2 for LOLIN D1 Mini Pro, now you should be able to make the internal and external LED blink.