Interrupt driven processing
The simple way to handle input events in a sketch is to check for them each time through the main processing loop. If there is no other processing going on, this is very wasteful in terms of resources. The processor of a Particle Argon runs at 12Mbps which means that you are checking for, say, a button press thousands of times a second. Sometimes, it is convenient to include a delay so that the check is performed at regular intervals. Even so, you are probably doing lots of pointless checks.
Checking for a button press inside a complex sketch presents a different problem. Because all of the processing in a sketch is performed on a single thread, there may be a significant delay between the user pressing a button and the event being recognised by the code. It is also possible that if a button press occurs while other processing is going on, it may be missed altogether.
The solution to both of the problems described above is to use a programming technique that allows you to respond to input events when they happen. The same technique also allows you to put your device into slepp mode when there is nothing happening to conserve energy.
A simple button sketch
The code below is a typical implementation of a sketch that responds to user input. In this case, it checks for a button press on pin D3 and initiates a series of LED flashes if one is detected.
1 2 3 4 5 6 7 8 9 10 11 12 13 14 15 16 17 18 19 20 21 22 23 24 25 26 27 28 29 | |
You can see how much effort is being wasted by opening the serial monitor. The stream of numbers is a running count of how many times the button press check has been performed.
To see the responsiveness problem, try pressing the button a second time before the sequence of flashes completes. Because of the delays built into the main loop, the additional button presses are simply ignored.
Interrupts
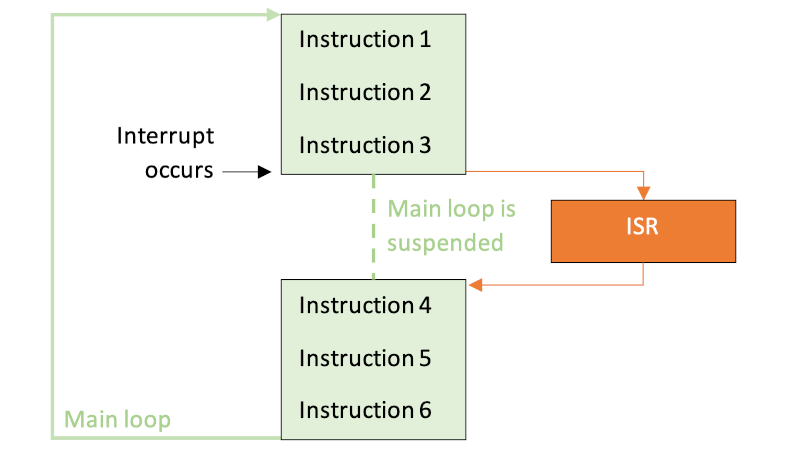
As the name suggests, an interrupt causes the main processing loop to suspend its operation while an interrupt service routine or ISR is executed. Once the ISR completes, the main processing loops simply picks up from where it left off. The image below illustrates this concept.
An interrupt can be attached to the state of a pin so that when its state changes, the ISR is triggered. You can specify whether the ISR is triggered when the pin state goes from HIGH to LOW (FALLING), LOW to HIGH (RISING) or either of these (CHANGE). We will adapt the button press sketch to use a RISING signal on pin 3 as a trigger.
1 2 3 4 5 6 7 8 9 10 11 12 13 14 15 16 17 18 19 20 21 22 23 24 25 26 27 28 29 30 31 32 33 34 | |
What's changed?
** Line 4:** We are now counting how many times the button has been pressed rather than just its instantaneous state
** Lines 4 & 5: These variables are declared as volatile so they can be updated in the ISR
** Line 11:** Attach the ISR to the button pin
** Lines 18 & 19:** Check whether there are still button presses to process, and decrement the count each time
** Line 29:** New ISR function
** Lines 30 & 32:** Code to debounce the button press - that is, to make sure that it is not accidentally counted multiple times
The big change now is that you can press the button multiple times even during the LED flash sequence and each case will be processed. However, if you look at the output in the serial monitor you will see a stream of zeroes while the system is idle showing that there is still unnecessary work being done.
Sleep mode
Most microprocessors offer a range of sleep modes for power conservation. An interrupt can be used to wake the device and resume normal processing.
NB: Different devices define different sleep modes, and even if the sleep mode has the same name as one in another device, yours may behave differently. Please check the documentation for your device.
The Particle Argon has an ULTRA_LOW_POWER mode which suspends the majority of its features, but allows the device to wake on a network event, incoming BLE connection or an interrupt signal. The version of the code below adds an instructions at lines 18-20 which puts the device into sleep mode and specifies that the wakeup signal will come from the button pin.
1 2 3 4 5 6 7 8 9 10 11 12 13 14 15 16 17 18 19 20 21 22 23 24 25 26 27 28 29 30 31 32 33 34 35 36 37 38 39 | |
NB: note that this version of the code also adds a delay of 5s at line 31. This is so that there is enough time to flash a new sketch to the device before it goes back to sleep again. If you get trapped in sleep mode, use the escape plan in the troubleshooting section.
Note that when the device wakes from sleep, it must connect to WiFi before it resumes processing.
Waking on a timer
Another option for coming out of sleep mode is to set a timer. Although not strictly related to interrupts, this is a useful technique when you want some processing to happen at regular intervals rather than on an incoming event.
To instruct the device to wake up after 10 minutes, modify lines 18-20 in the code above as follows:
1 2 3 4 | |
 A short hardware interrupt tutorial